A Glimpse into Ancient Micro-life: Cleaning Diatom Valves from Diatomite
By Nate Dube
Introduction
Diatomite is a sort of rock composed mostly of the glassy cell wall shells of prehistoric diatoms. Specifically these shells are known as frustules (the whole shell) or valves (half a shell). This stuff can be processed to produce a clean sample of almost pure diatom material, great for making slides. You'll see different distributions of species from different sources of diatomite; a partial snapshot of ecosystems dating back millions of years. If you ask me, it's pretty exciting to get a look at fossilized micro life!
The traditional processes for preparing diatomite involve a dangerous strong acid or base treatment, but diatom arranger Steve Beats shared a new, safer technique last year. His method involves boiling with sodium hexametaphosphate (a food-safe chelating agent found in some strong detergents) in concentrated hydrogen peroxide. I've tried both methods on a few samples, and Steve's produces wonderful results with way less stress.
Please be warned - concentrated peroxide is dangerous! It will burn skin and clothing, and under some conditions the vapors can irritate your eyes and respiratory system. Handle it like concentrated bleach with gloves, protective eyewear, and good ventilation.
Supplies & Equipment:
Diatomite chunks ($10-20 / https://ebay.us/m/VRCJb7)
600ml pyrex beaker ($10-15)
Watch glass / cover for the beaker ($5-15) or aluminum foil
250ml watertight bottle ($20 / 2 dozen) or jar
Small vials for storage, 1.5ml microcentrifuge or 2ml autosampler ($10-20 / 100+, optional)
25 to 50ml syringe, 1" 14 gauge luer tips ($5-15)
3ml pipettes ($10)
Hotplate or electric stovetop
Distilled water ($3 / gallon)
Concentrated hydrogen peroxide, 13% ($20 / gallon)
Sodium hexametaphosphate, 99% ($25 / 100g)
Latex or nitrile gloves ($5-10)
Protective eyewear ($5-30)
The total cost from scratch will be roughly $75 to $200, and the process will take a few hours of work distributed over a few days or weeks. In return you'll have a lifetime supply of a very interesting and dense sample of diatoms to enjoy and share with your microscopy pals.
Workflow overview:
Break up the chunk diatomite into a powder
Pre-rinse the material to remove salts and fine silt/clay
Boil and treat to further break up and dissolve minerals
Rinse again to remove dissolved minerals
Separate diatoms from heavier/lighter material
Store the clean diatom material for later use
The method Steve described was intended for processing 1 gram of diatomite at a time, but I wanted to handle larger samples without the need for a sieve so I'm including some extra steps. You should feel free to treat these instructions as suggestions and remix to suit your needs or interests! For example, you could skip steps #1 and #2 and jump straight to the boil... even as far as measurements go I've provided example volumes and weights but I personally just eyeball everything and it usually works out fine.
1: Break up the diatomite
The obvious way might be to crush and grind it down, but this will release unhealthy silica dust and destroy a ton of the material (this is how store-bought diatomaceous earth is processed, which could also be cleaned using these techniques though you'll find that the majority of the diatoms are damaged). A gentler method involves soaking the diatomite in water, then repeatedly freezing and thawing. The expanding ice thoroughly breaks down the chunk leaving the diatom frustules/valves mostly intact.
Break up 5 to 10 grams of diatomite by hand only as necessary to fit into your bottle/jar
Add tap water to cover the diatomite, filling no more than half the bottle
Leave it in the freezer until solid (a few hours)
Take it out and let it thaw (a few hours, or 1-2 minutes in the microwave)
Shake vigorously
Repeat the freeze/thaw/shake steps 2 to 10 times
If all goes well you'll be left with mostly fine sediment including some larger particles of sand or small rocks. Purer white diatomite only takes a few freeze/thaw cycles, but if the sample is tan or brown I've found that it can benefit from as many as 5 to 10 cycles.
2: Pre-rinse the material
This is optional, but it's a useful technique to practice and it will slightly reduce time and foaming during the boiling step.
Fill the bottle with tap water
Shake vigorously
Wait at least 30 minutes for the material to settle to the bottom
Use the syringe to gently remove as much water as you can from the top down, being very careful not to disturb the sediment (pouring the water off is also an option but you'll need to be especially careful)
Repeat as many times as you can tolerate, or until the water remains clear after settling (5 to 40 times)
The settling time depends on your patience and preference. Most diatoms will settle in under an hour, but very, very tiny forms can take up to 8 hours (this is the time recommended by the California state standard operating procedure for analytical diatom preparation). On the other hand, if you wait too long the fine silt you're trying to remove will also settle. I'm only interested in larger forms that are easier to work with for diatom arranging, so 30-60 minutes is plenty for me. In any case it's not a precise matter. I don't set a timer for the rinsing process, I just leave the bottle by the sink and do rinses randomly throughout the day.
If you manage to get the solution to clear up you might be satisfied stopping here; as long as there isn't much too much silt the diatoms will be visible enough to identify without any further treatment. For some samples this can take weeks. Go ahead and inspect a few drops of material every so often as you go to get a good feel for the progress you're making in the cleaning process.
3: Boil the material
This chemical treatment will increase the solubility of the minerals drastically, reducing the amount of rinsing you need to do and producing a purer sample that is more suitable for making slides or diatom arrangements (crystallization of invisible mineral residue can ruin a permanent slide). Make sure to don your PPE when handling the peroxide.
Let your diatomaceous sediment settle in the bottle
Collect 10-30ml of the settled material using a syringe and add it to a clean 600ml beaker
Add around 10g of sodium hexametaphosphate
Add hydrogen peroxide to fill the beaker up to 300ml
Cover with a watch glass or loosely fitted aluminum foil
Bring to a gentle rolling boil
Boil for 2 to 4 hours. Do not leave it unattended - check on it every 30 minutes. When the peroxide level drops below 250ml, add fresh peroxide to fill back to 300ml
4: Final rinsing
After boiling, allow the solution to cool down and settle. Repeat the rinsing process until the solution remains clear after settling for 30 minutes, being especially careful for the first few rinses as you siphon off the peroxide. The final product should be very close to pure white. Otherwise, or if after six or more rinses you don't feel like you're making progress, you may want to repeat the boiling step.
Perform a few more rinses in the beaker after it's clear to ensure any dissolved salts or excess sodium hexametaphosphate have been removed. And finally, rinse 2-3 more times with distilled water to remove minerals introduced by your tap water. Make sure to keep the beaker covered to prevent dust from contaminating your hard work!
5: Separate diatoms
Now that the material is nice and clean, we can perform one last step to separate sand and pebbles from the diatoms. There are two techniques you can try...
The simplest way is a sort of gold panning technique in the beaker. With the beaker half full, swirl the solution by hand to get everything spinning as fast as possible and leave it to settle yet again. Heavier particles will settle in the very center and lighter ones (diatom valves) towards the edge - you might see a noticeable mound in the middle of the beaker. Use your pipette to collect material from the edges back into a clean bottle or into vials. Repeat the swirl and collect process a few times until you're satisfied. Heavier, larger diatoms will settle closer to the center, so you might want to inspect as you go. For me it's hard to sacrifice any material, but you've got to use your best judgement to decide what's worth keeping.
A more involved technique involves setting up a settling column of 3 to 6 feet of vertical tubing full of distilled water with a separatory funnel or stopcock at the bottom. Add material to the top of the column and watch it sink to the bottom. Sand and pebbles will reach the bottom first, followed by larger diatoms, then small diatoms, then smaller debris and silt. You can use the separatory funnel to fraction off these products into vials every few minutes. Having diatoms separated by size is great for arranging, but you can also recombine your samples to make more representative strews.
6. Storage and viewing
If everything went well you should have more clean diatoms than you'll ever know what to do with - just 0.25ml of solid material at the bottom of a vial can represent millions of diatom valves! They should keep indefinitely in distilled water, but if you want to play it safe you can add 0.5-1ml of ethyl or isopropyl alcohol to mitigate microbial growth.
Diatoms are best viewed dry. To prepare them, simply clean a slide, shake your vial up, and add 1-2 drops of diatom material using a pipette. Use the pipette tip to spread the diatoms around as much as possible, then leave the slide to air-dry (heating it to speed up the drying will cause the diatom valves to clump up). I usually view them without a coverslip, taking extra care not to bump the objective lens into the material. If you want to use a coverslip they can still be viewed wet but the contrast will suffer, and preparing permanent slides might be a topic for another day.
Conclusion:
If you made it this far and decided to process some diatoms, please let me know! I would love to trade for new samples, as would many other diatom enthusiasts. Thanks for reading!
Attached photos:
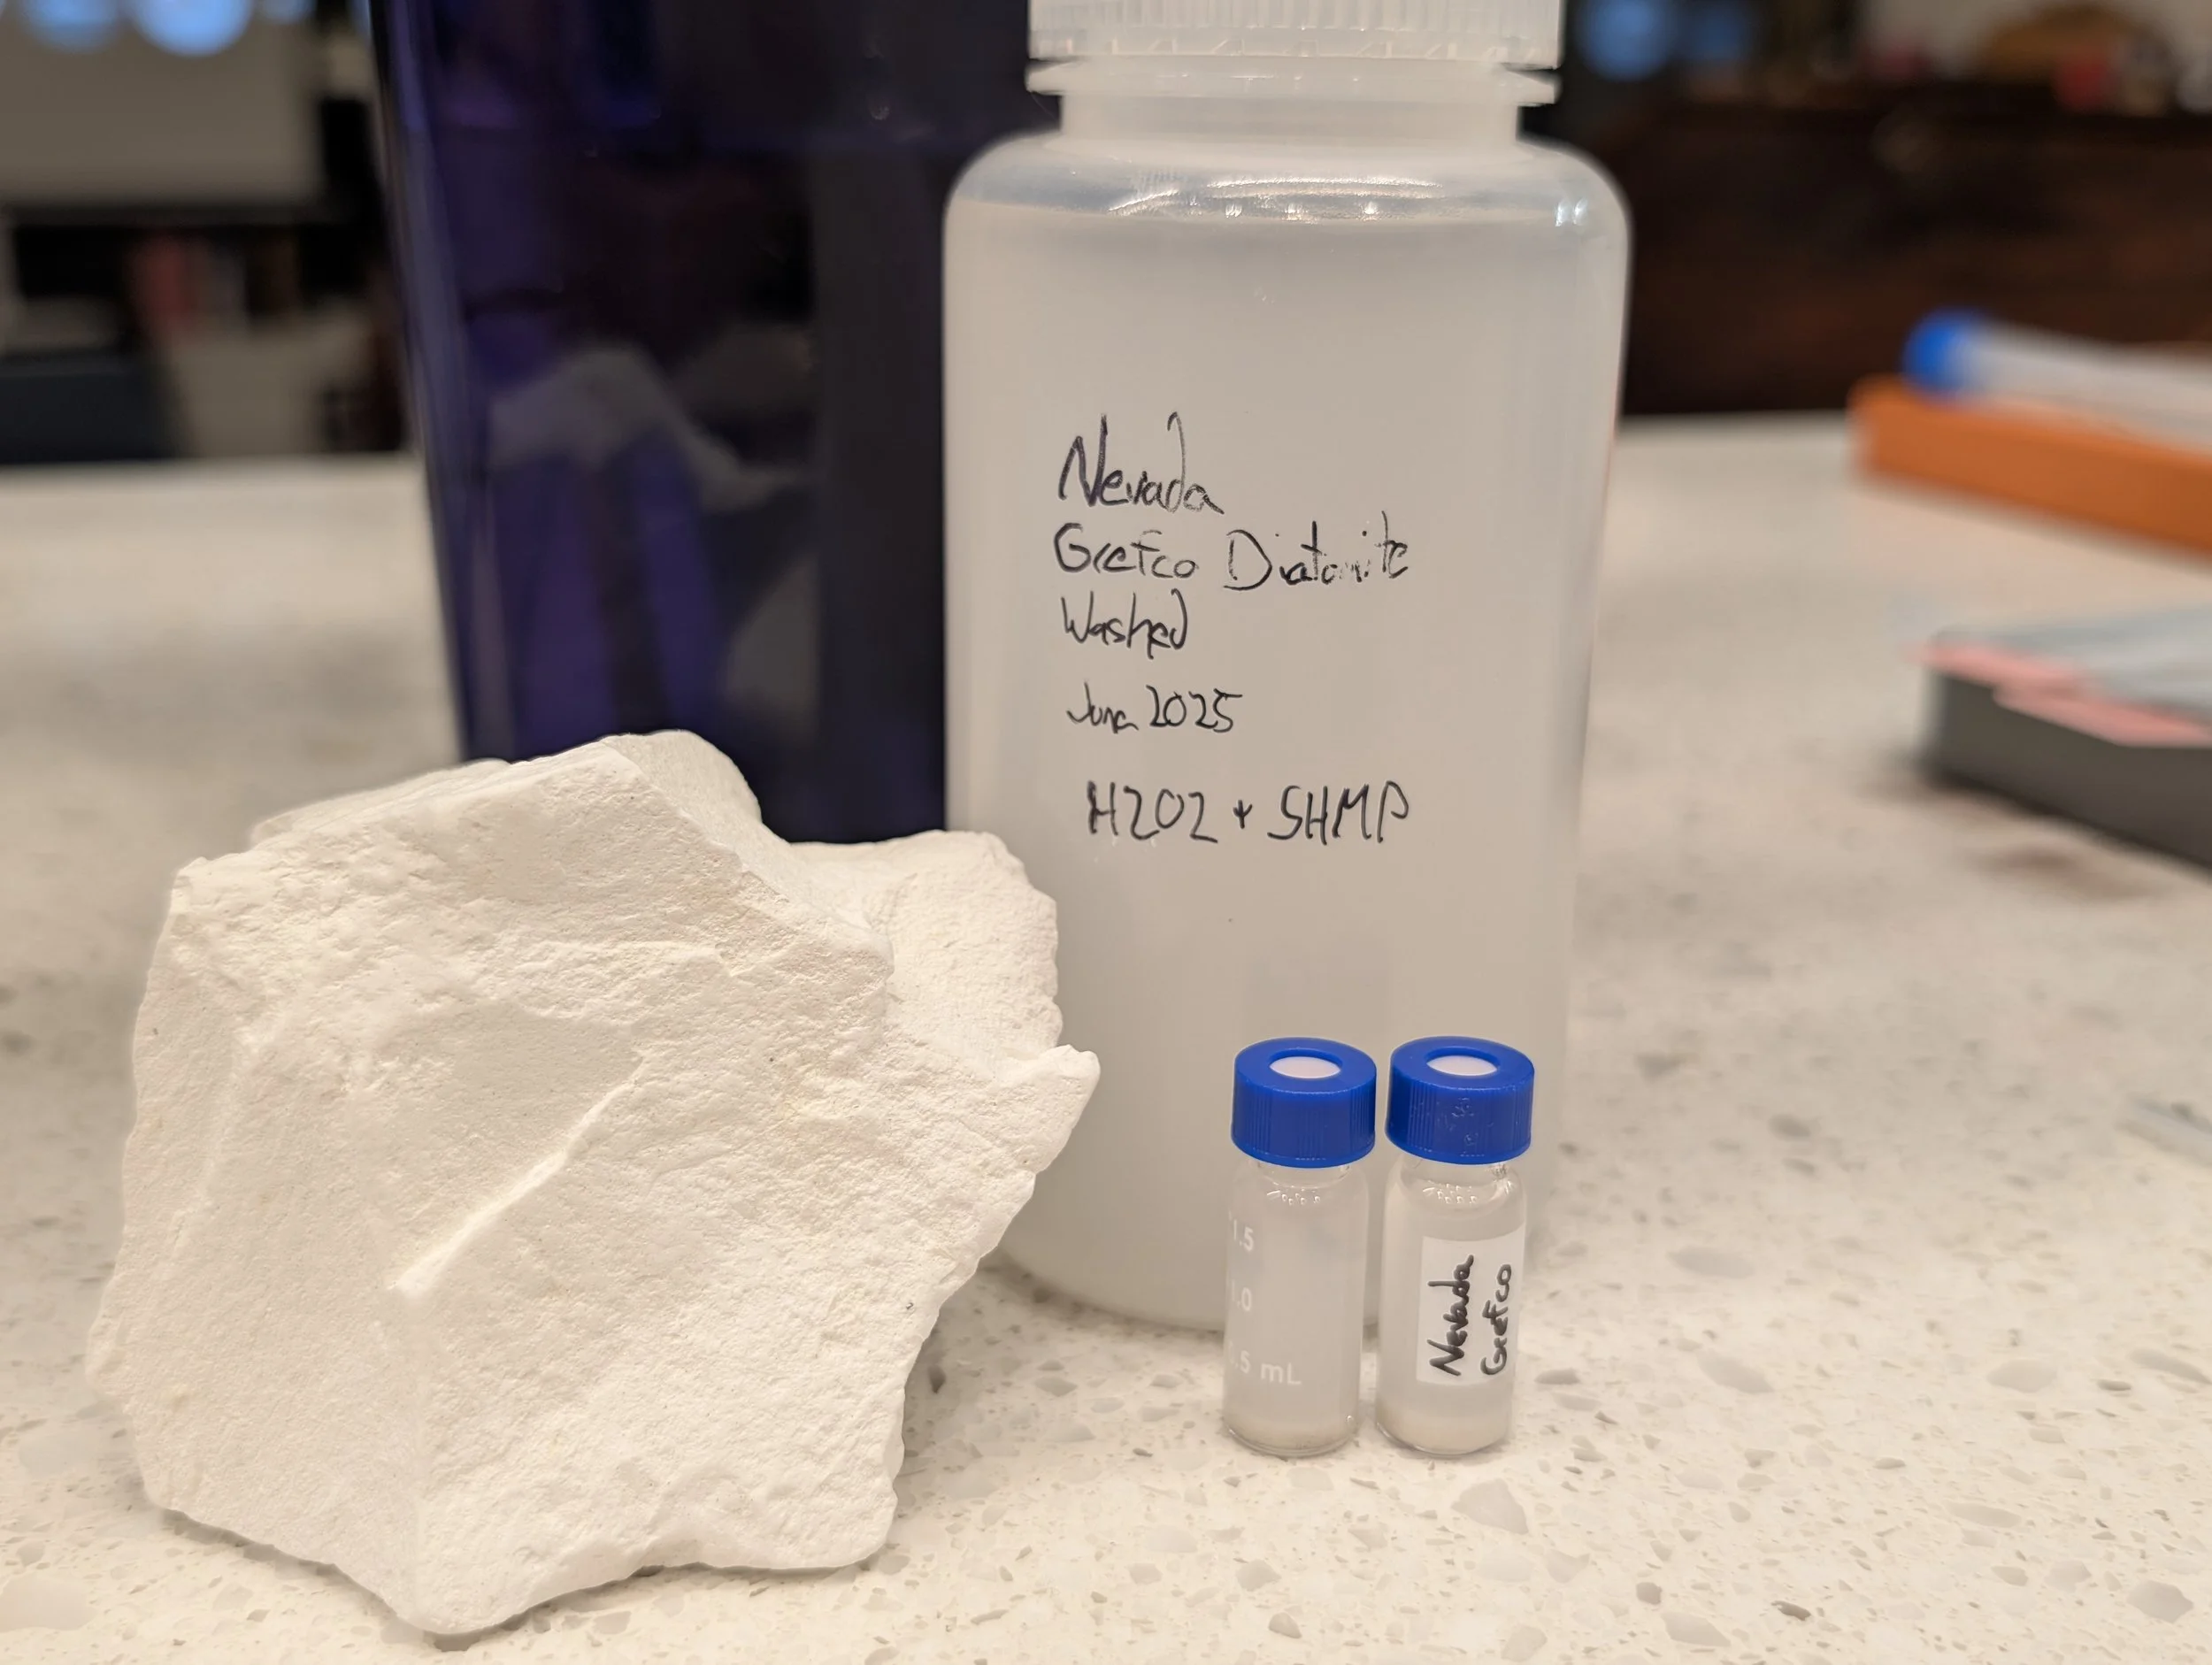
A chunk of diatomite, and a bottle/vials containing the clean material after processing
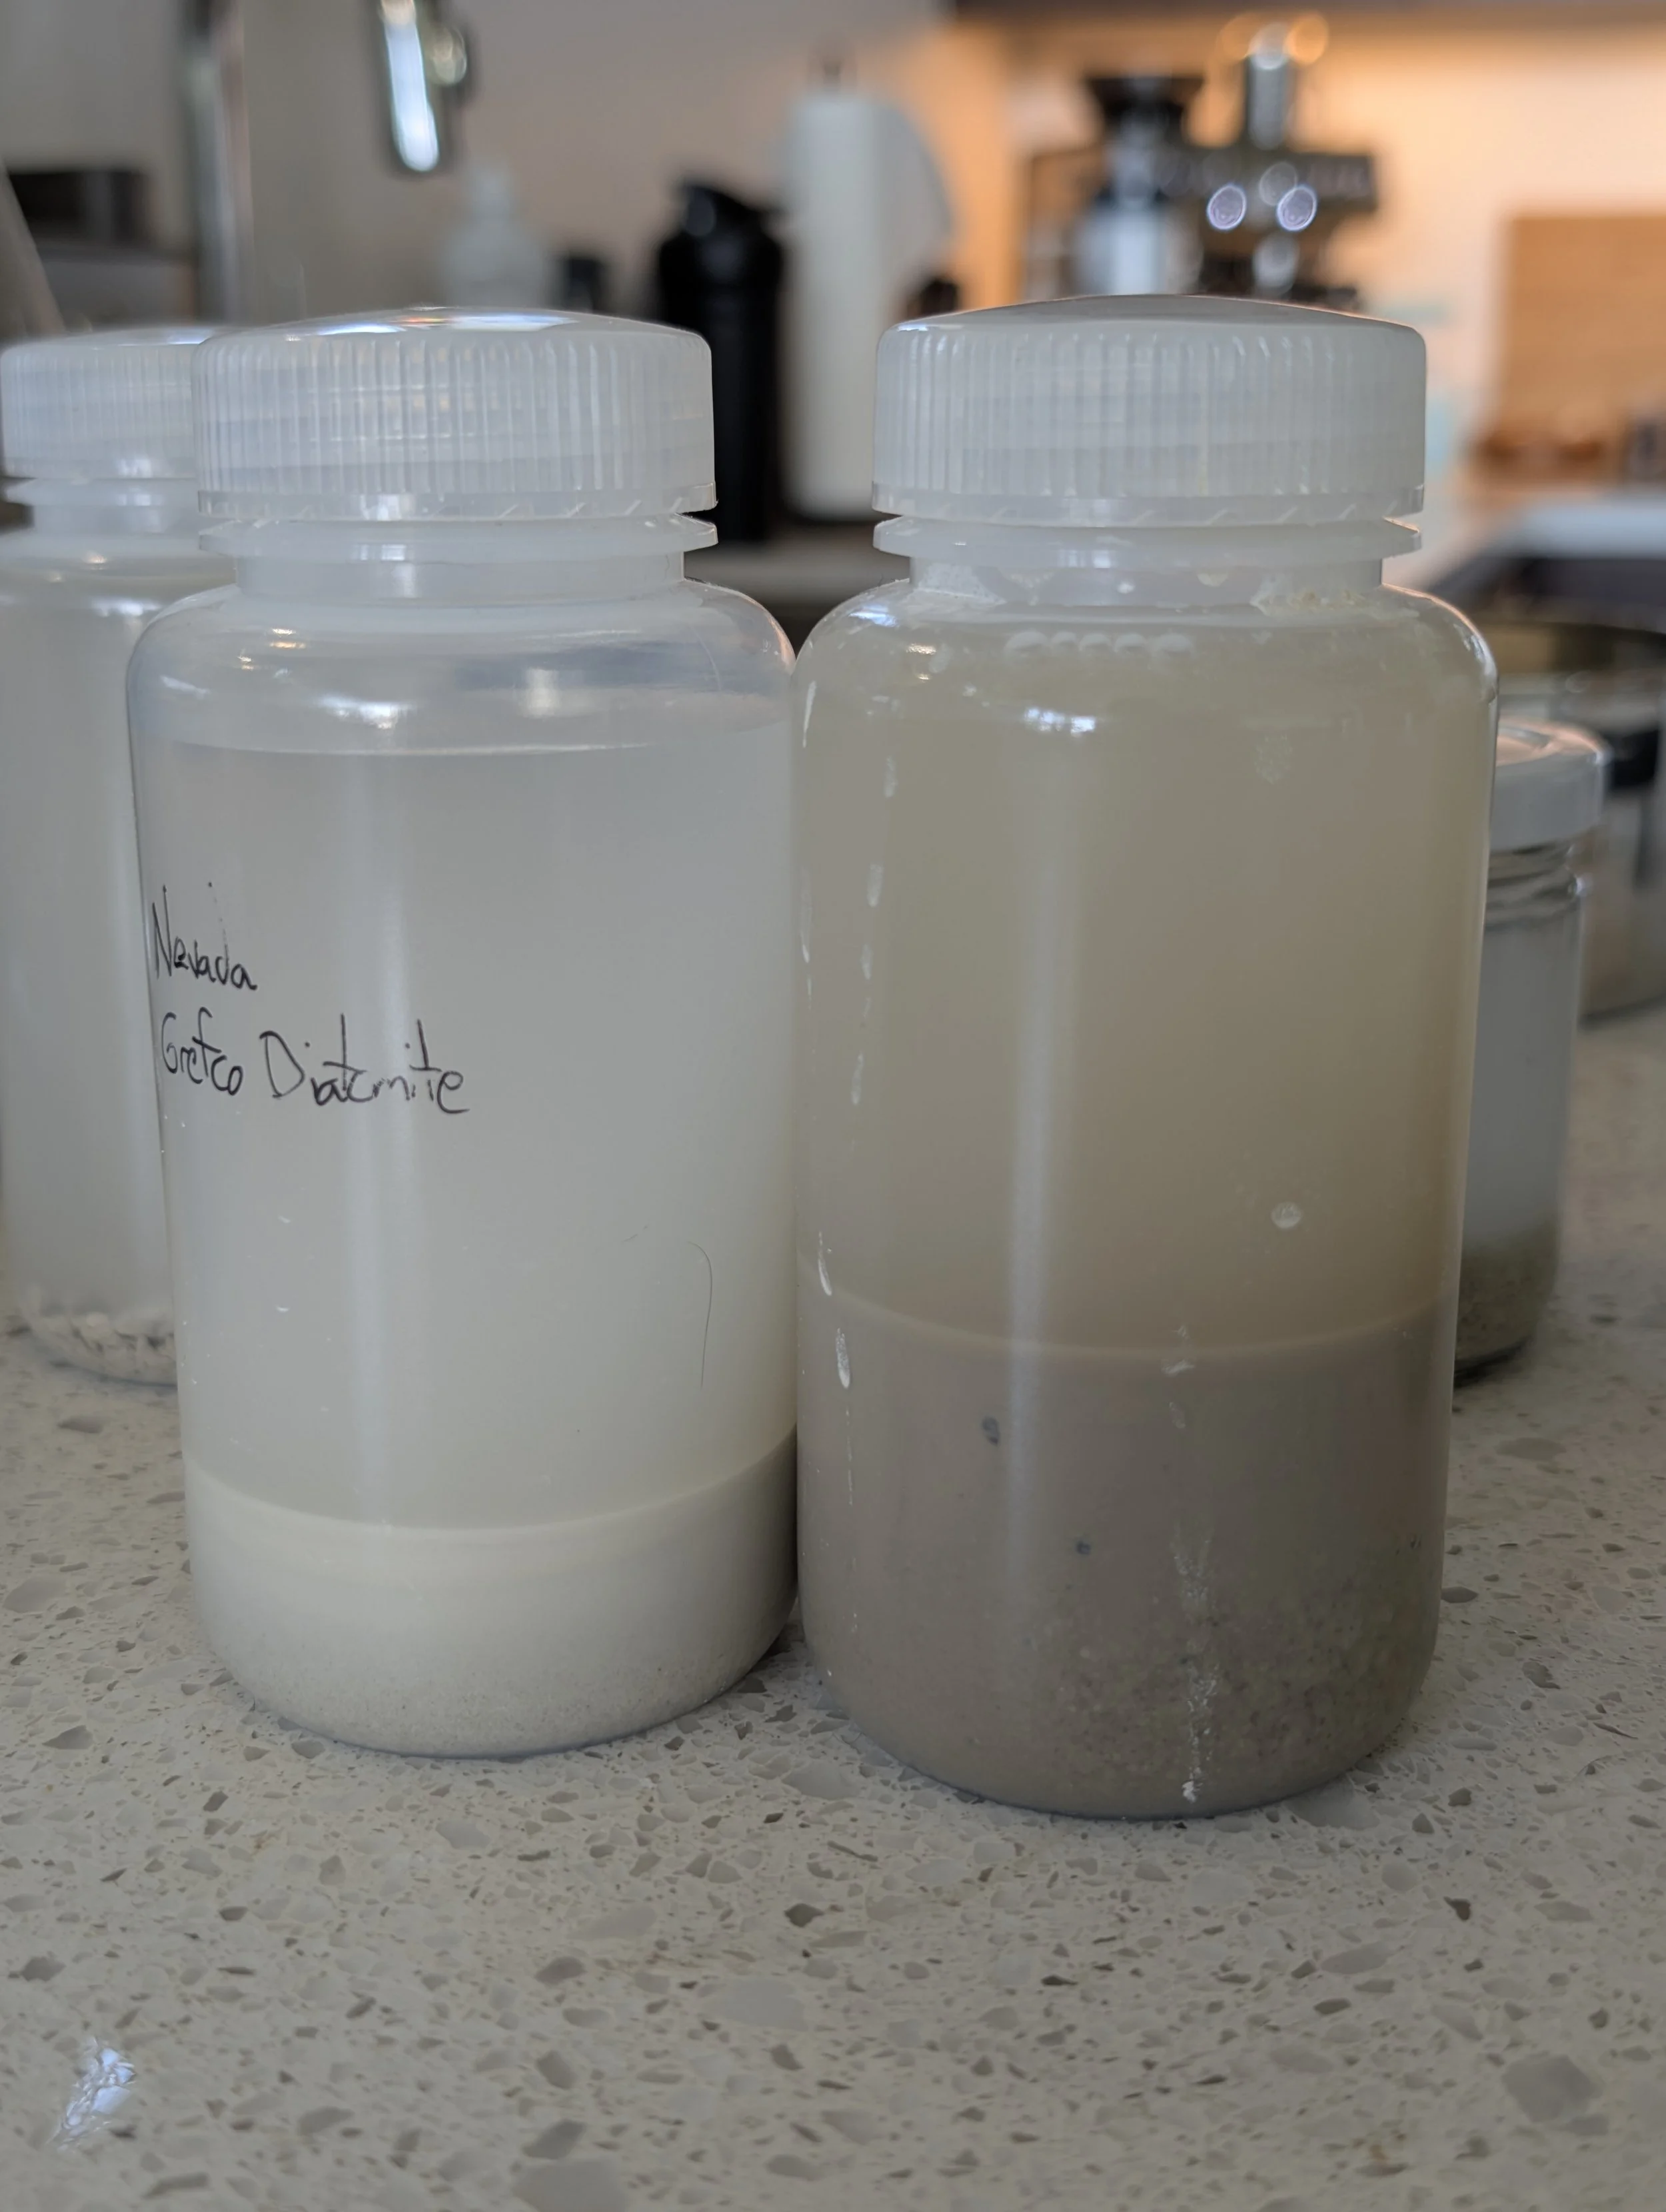
Bottles of diatomite that have been frozen to break them down for processing. Samples from different areas will be different colors, and darker samples will take more effort to clean
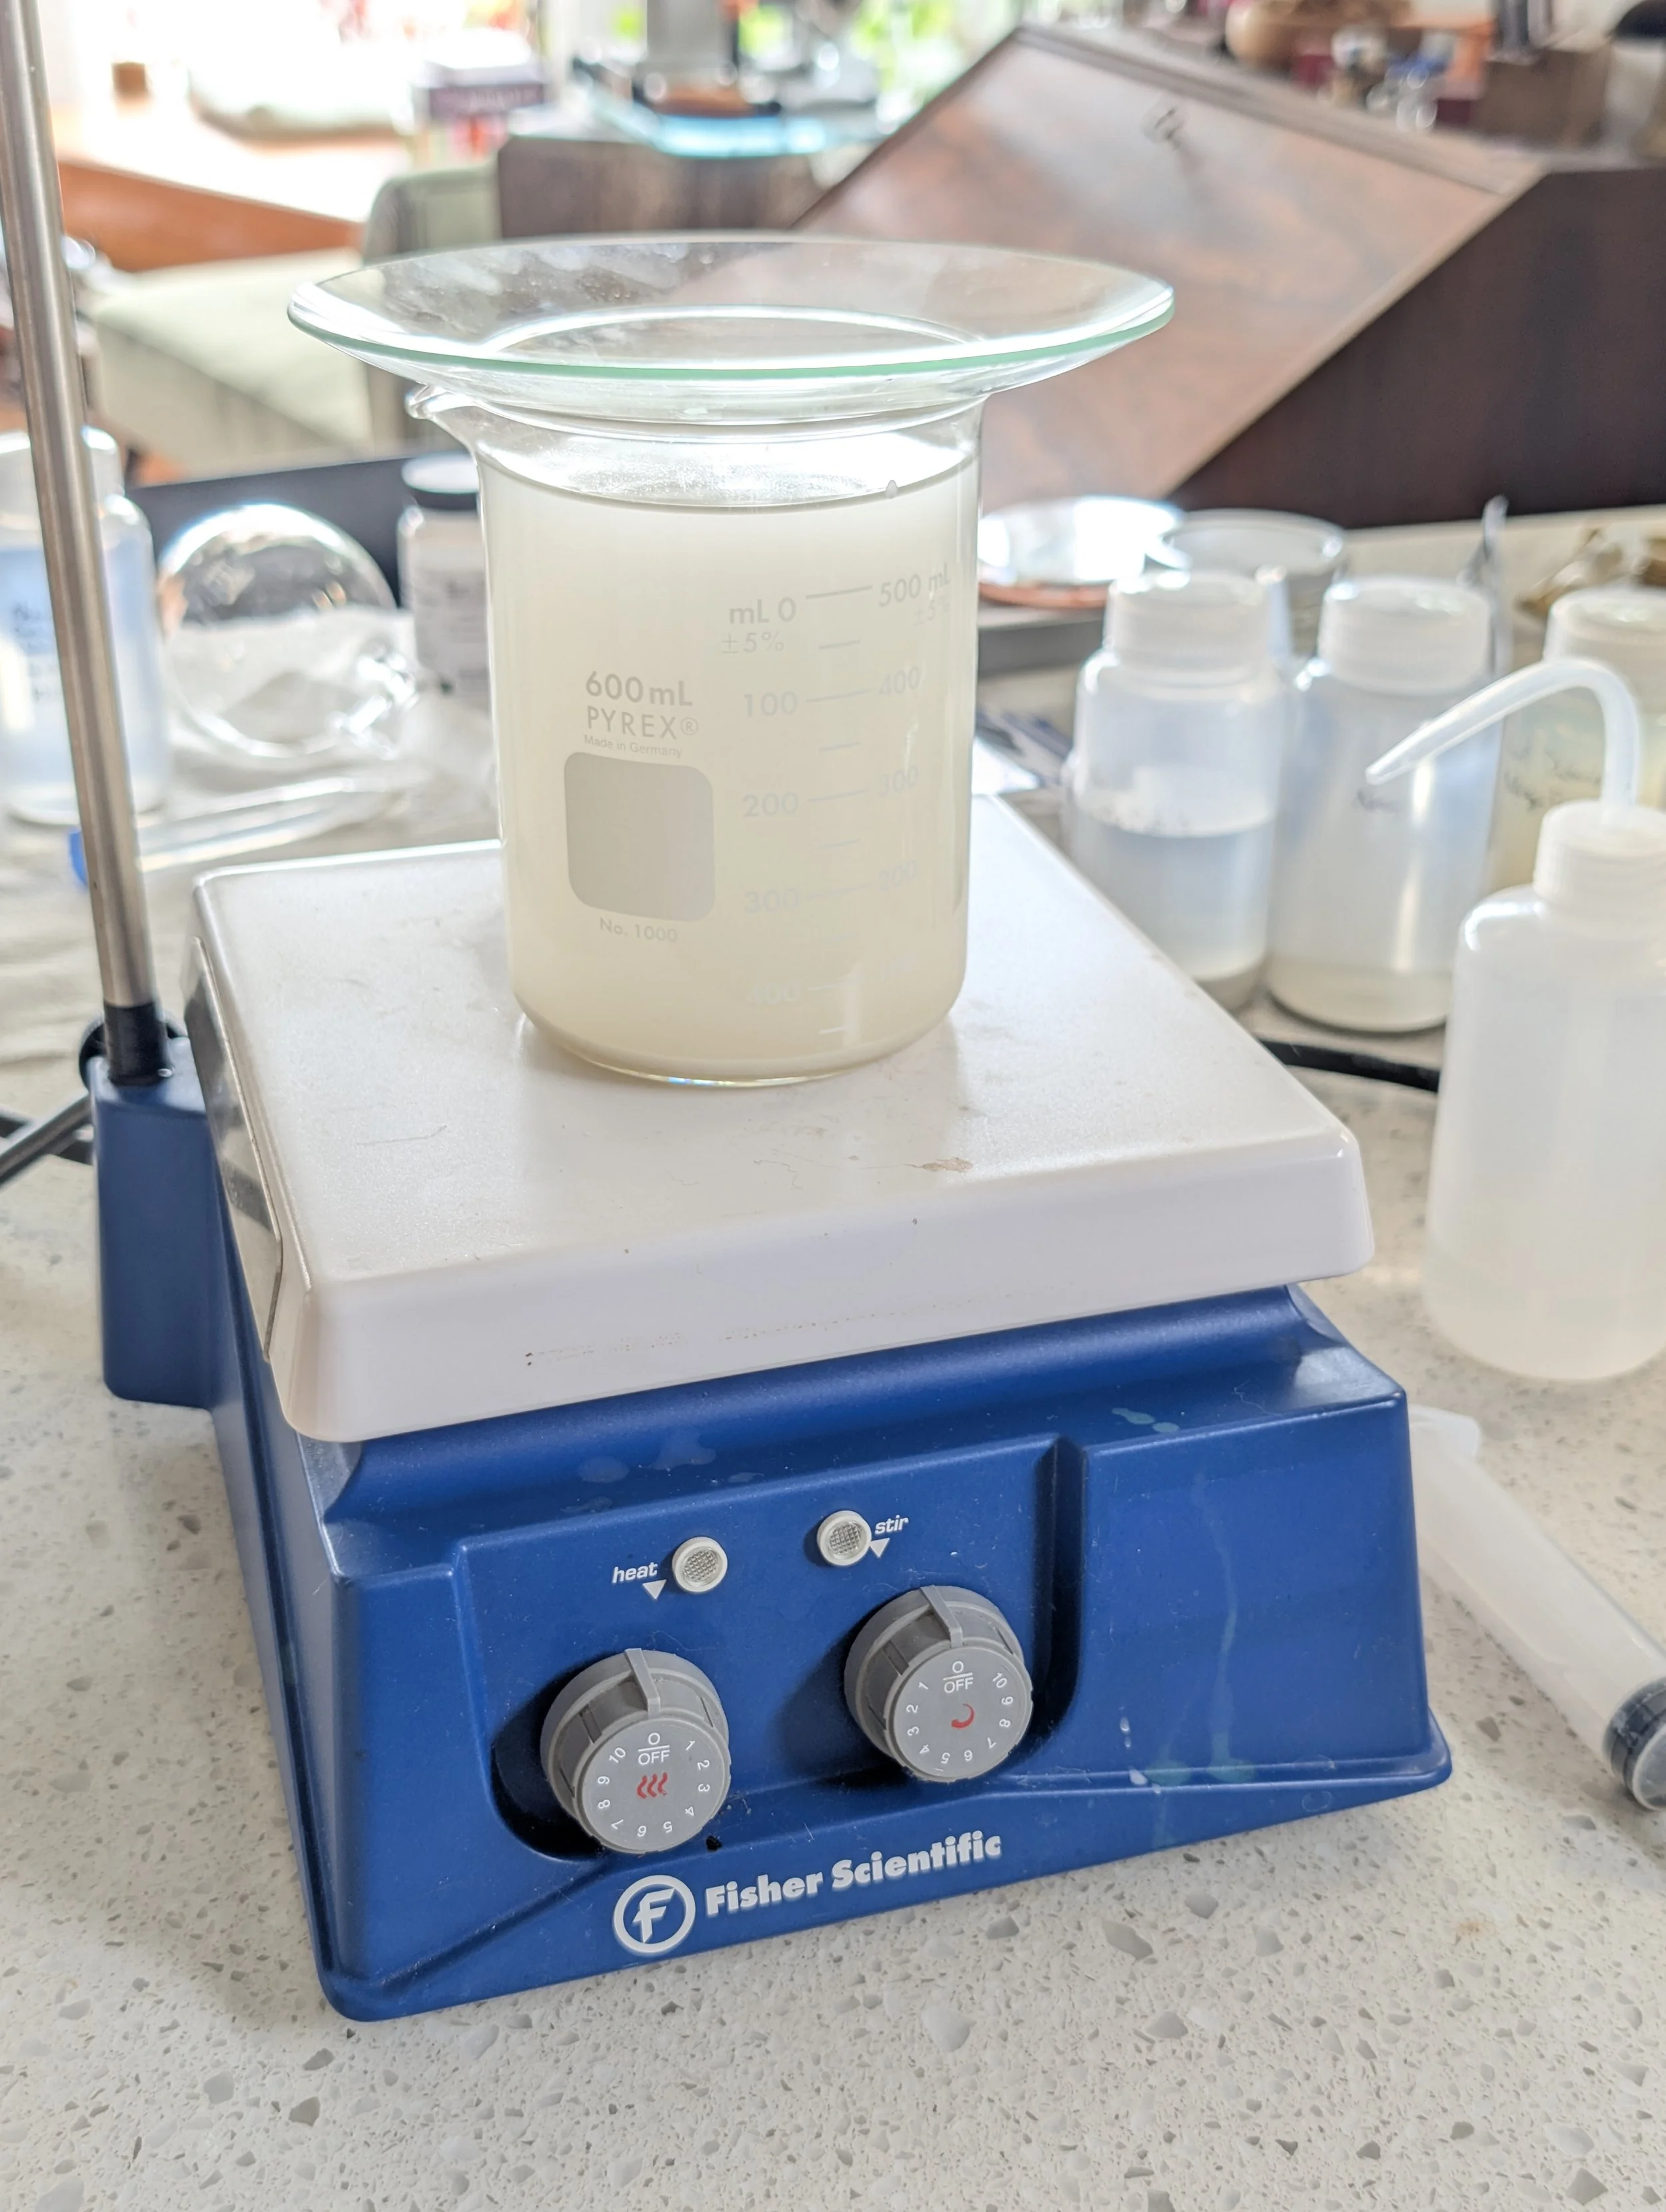
A beaker of material after the boiling process. You can see the solid diatom material at the bottom, and the dissolved silt that needs to be poured away floating above it.
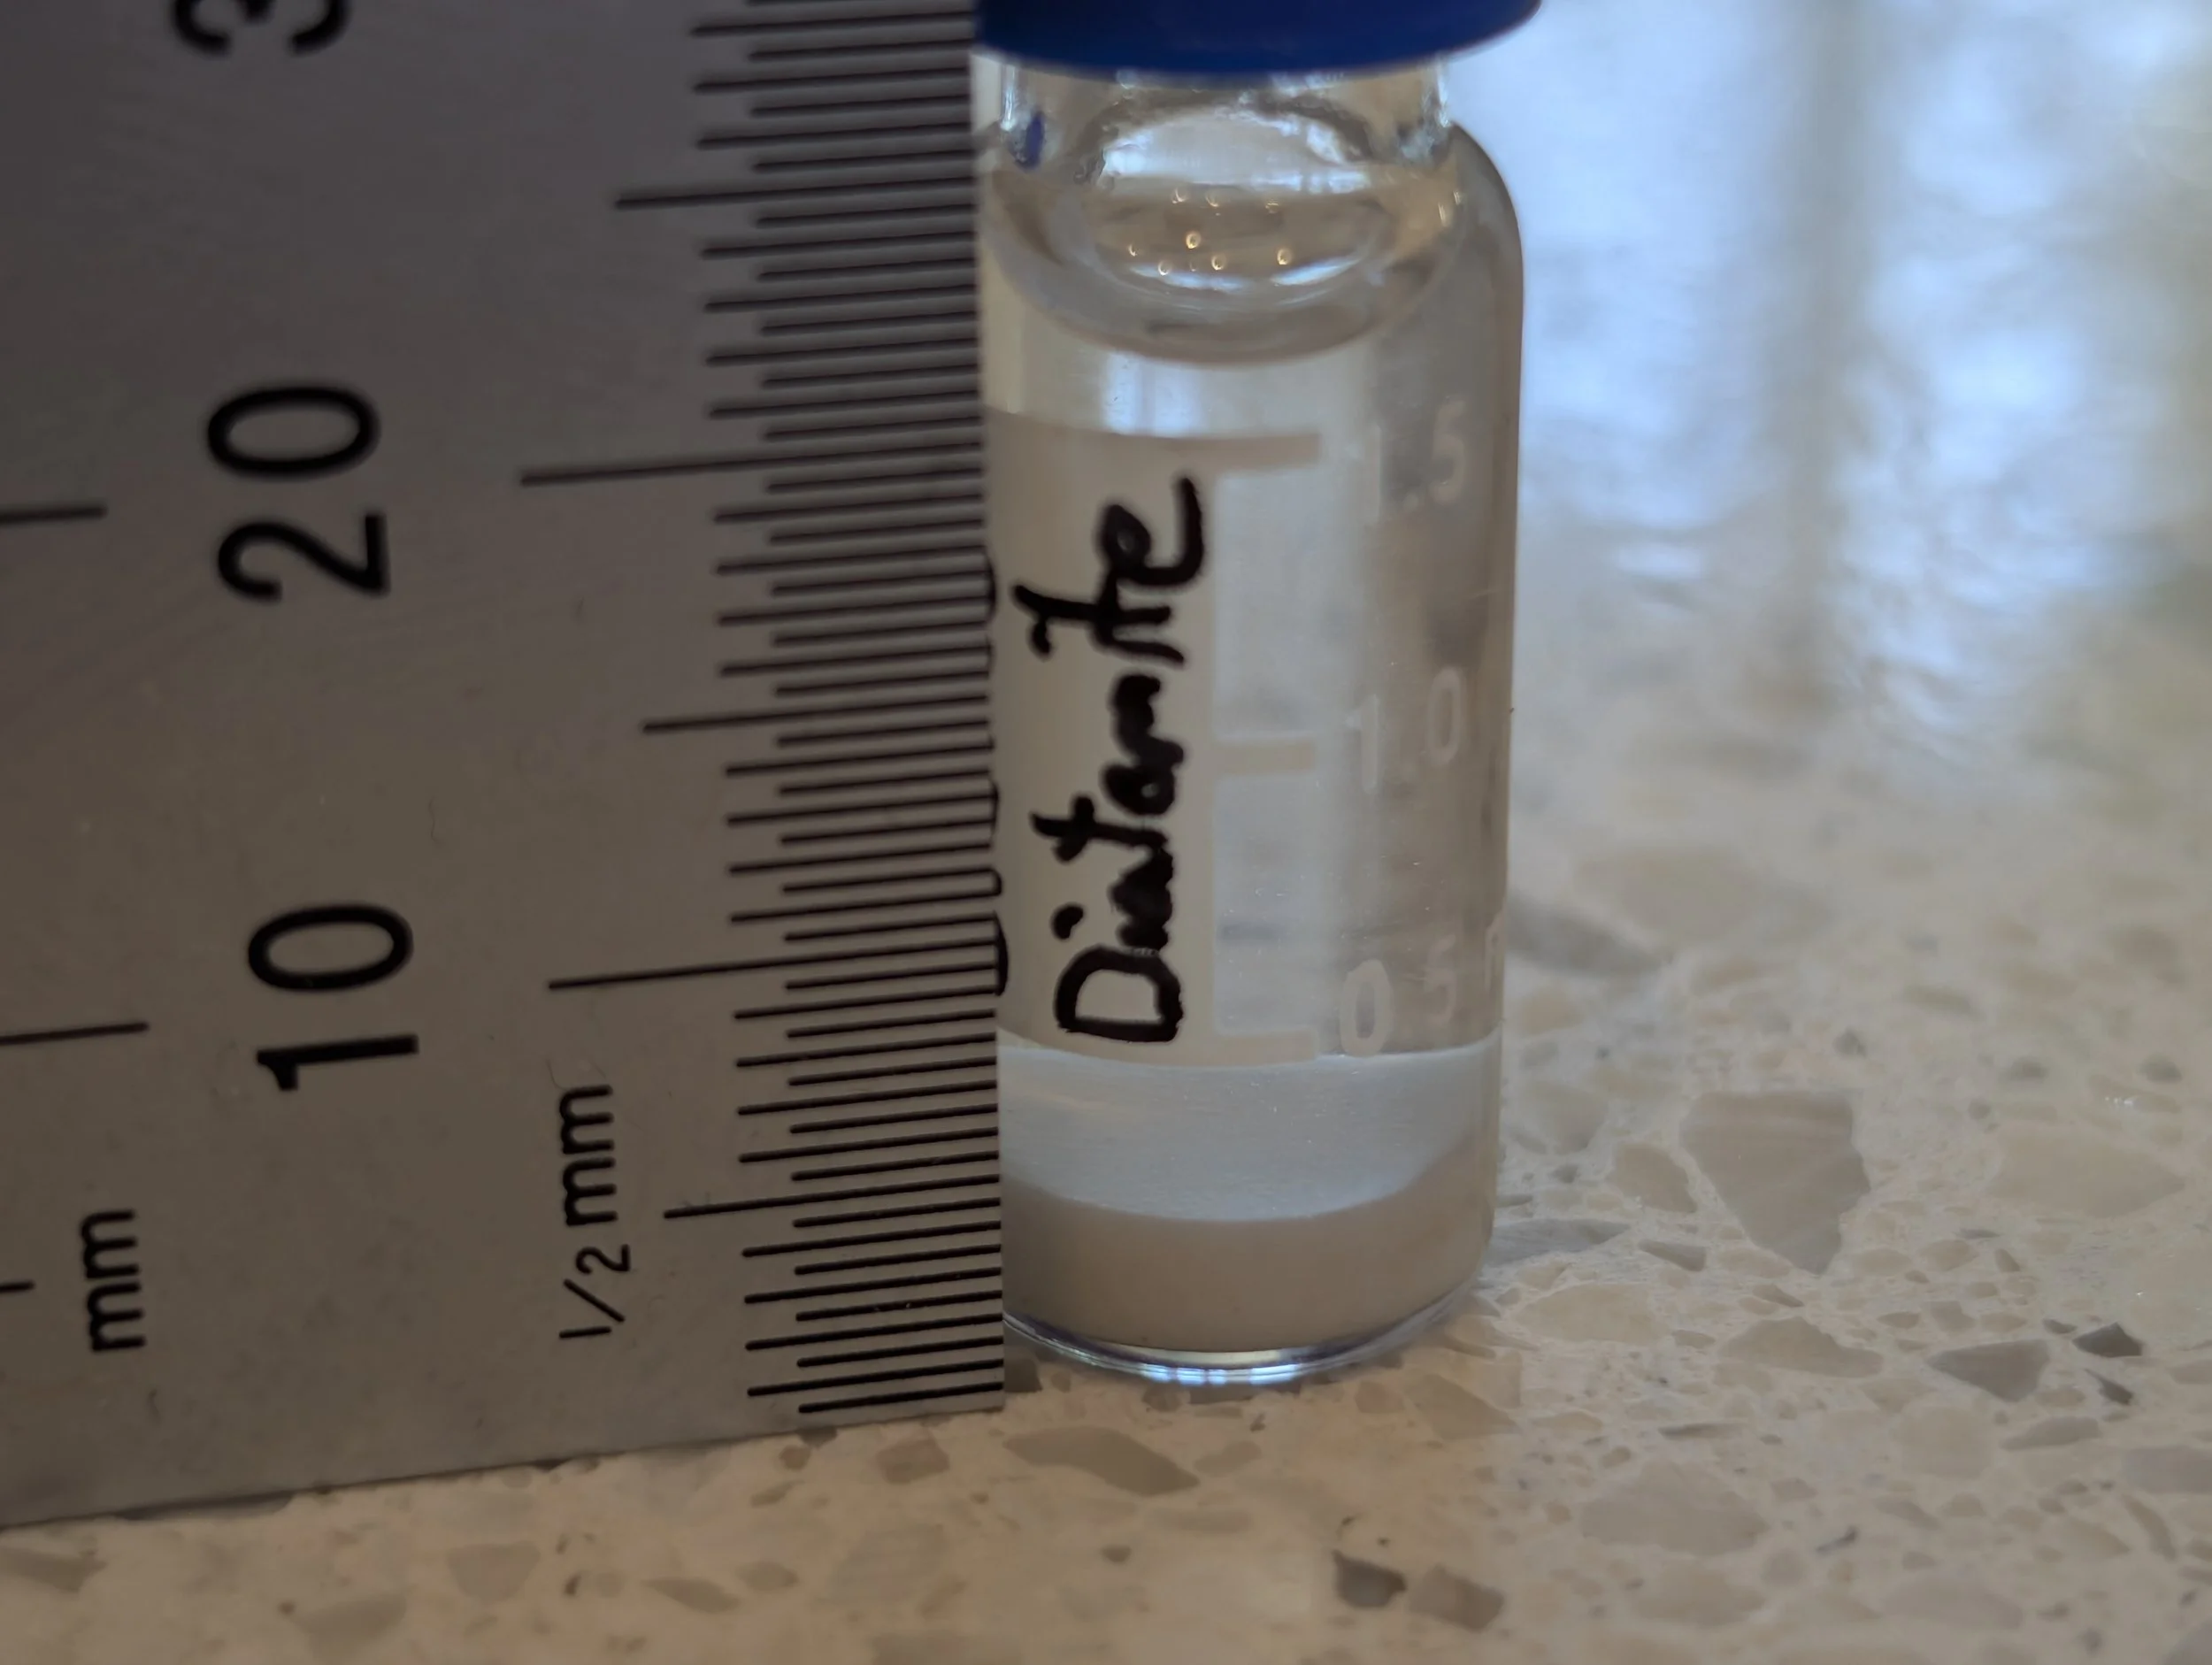
Clean diatom valves collected in a vial after the cleaning process
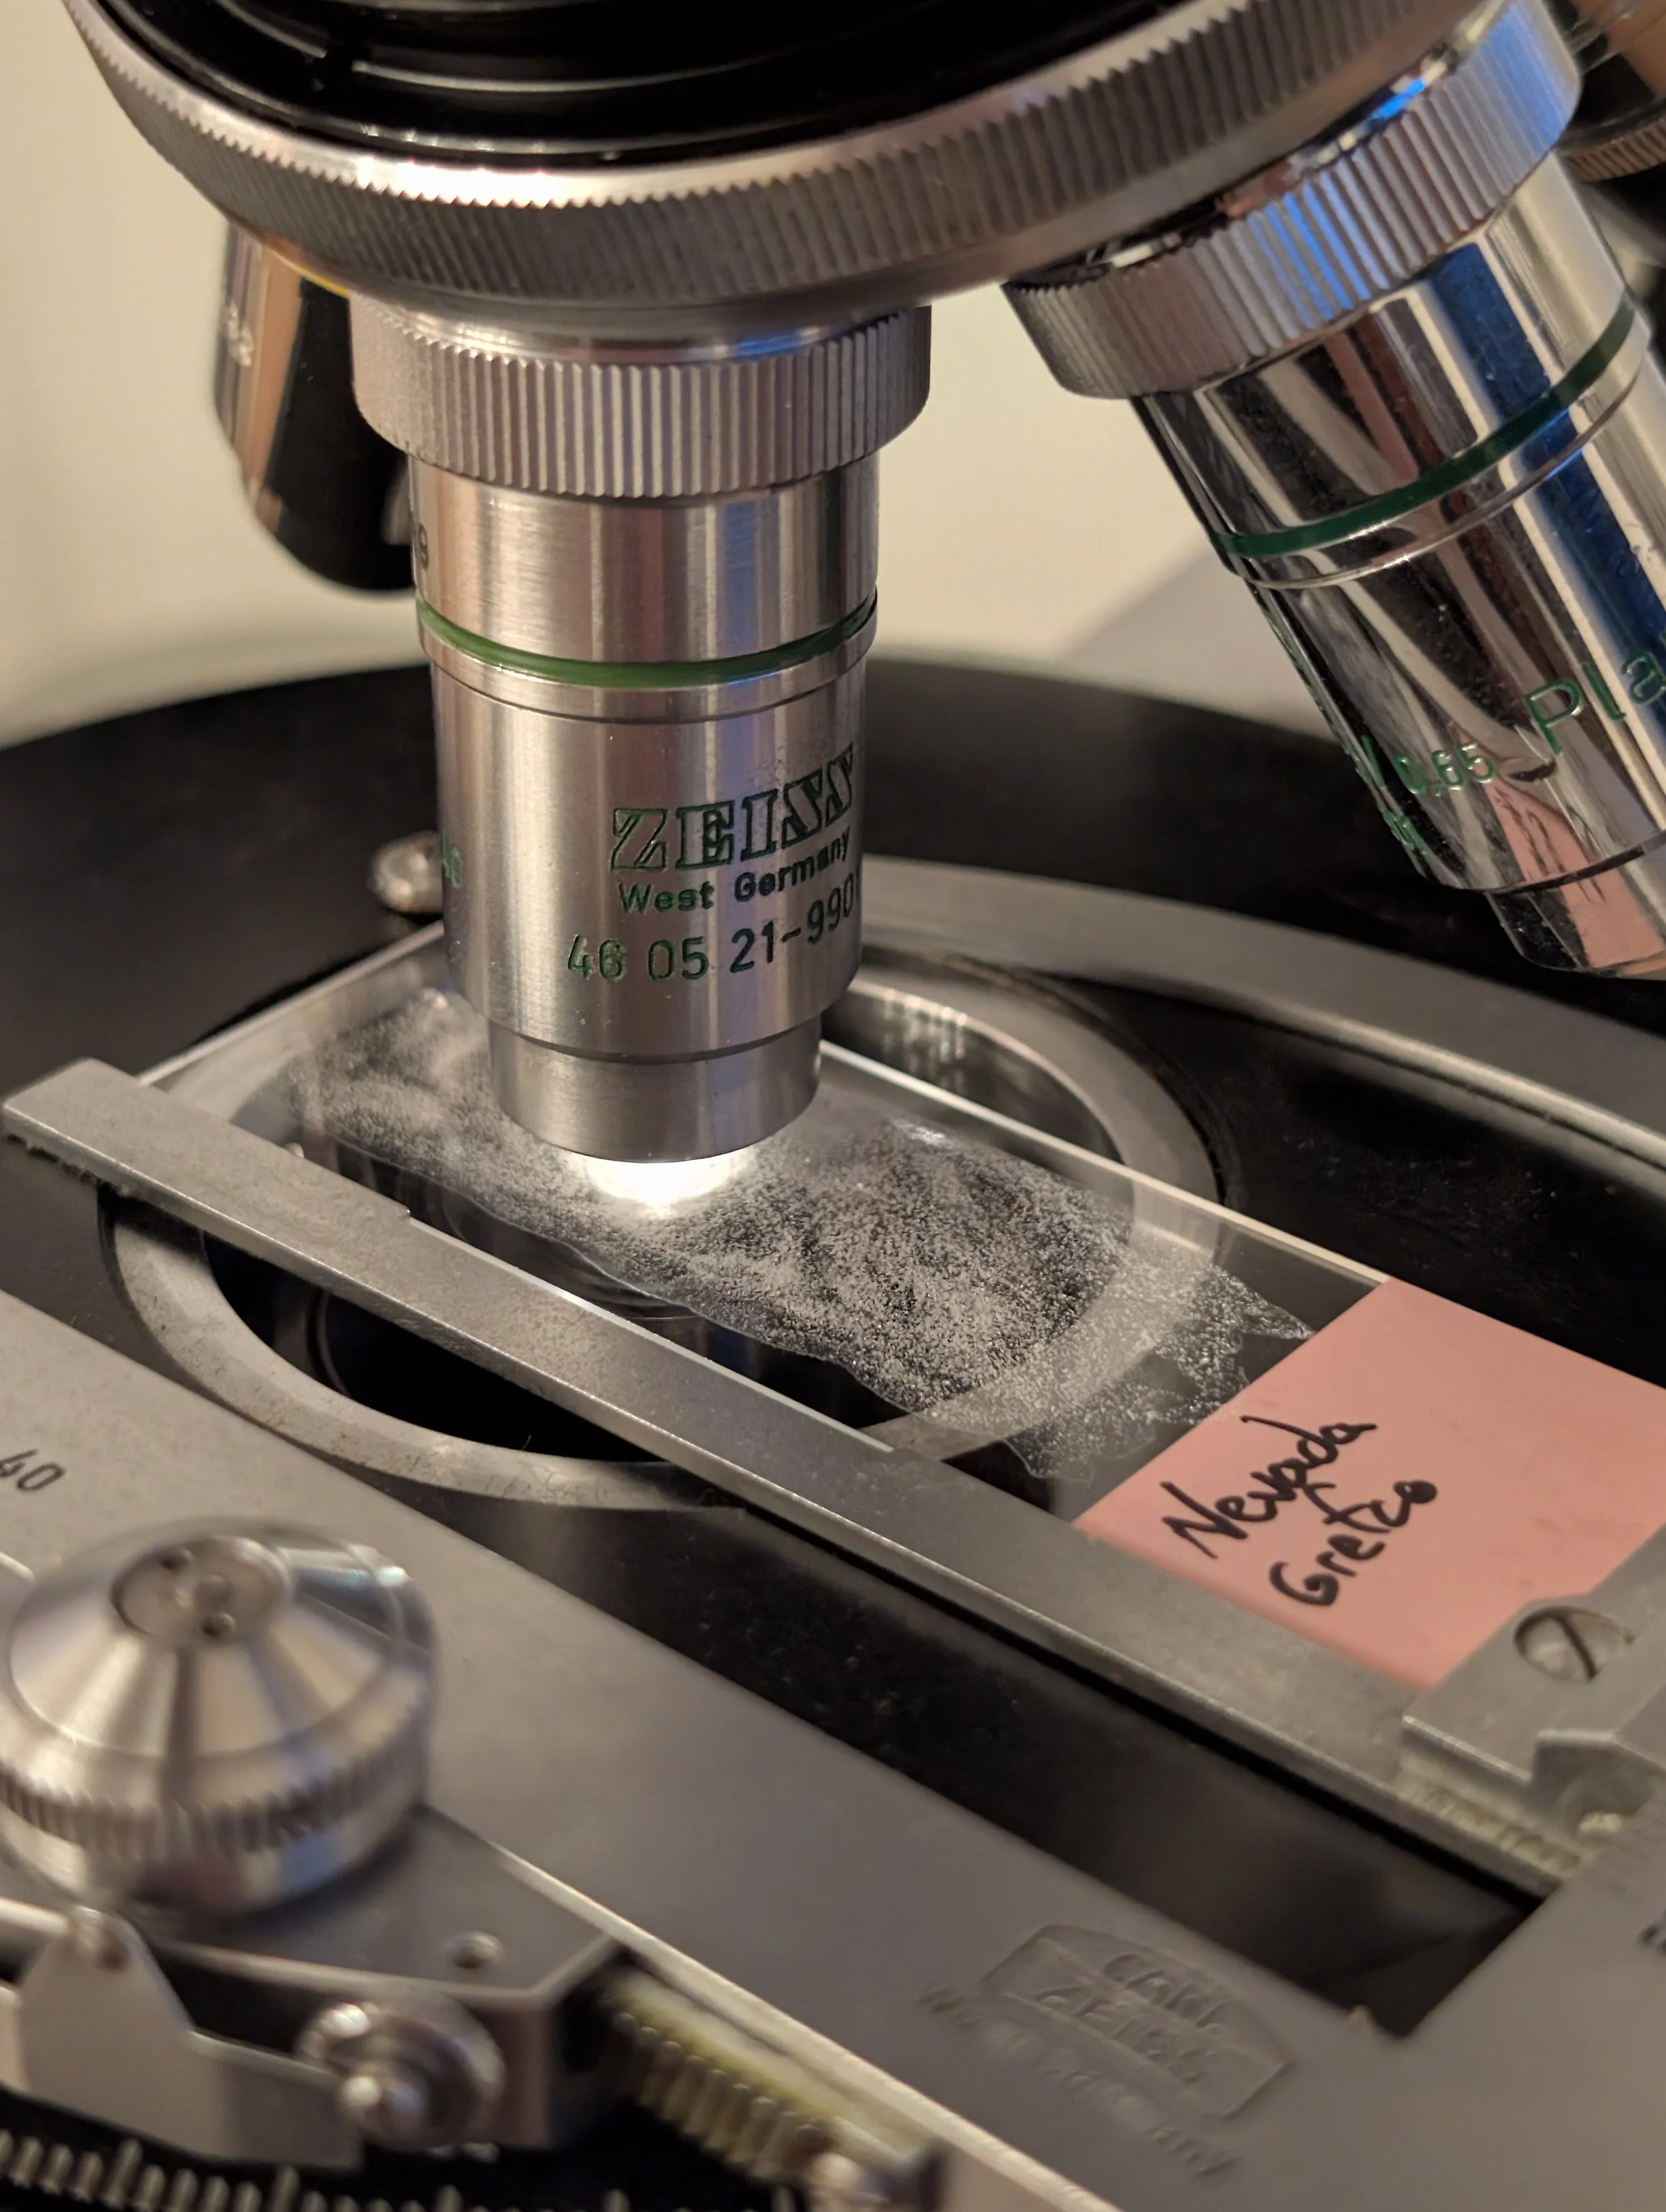
A slide prepared with the dry diatom material
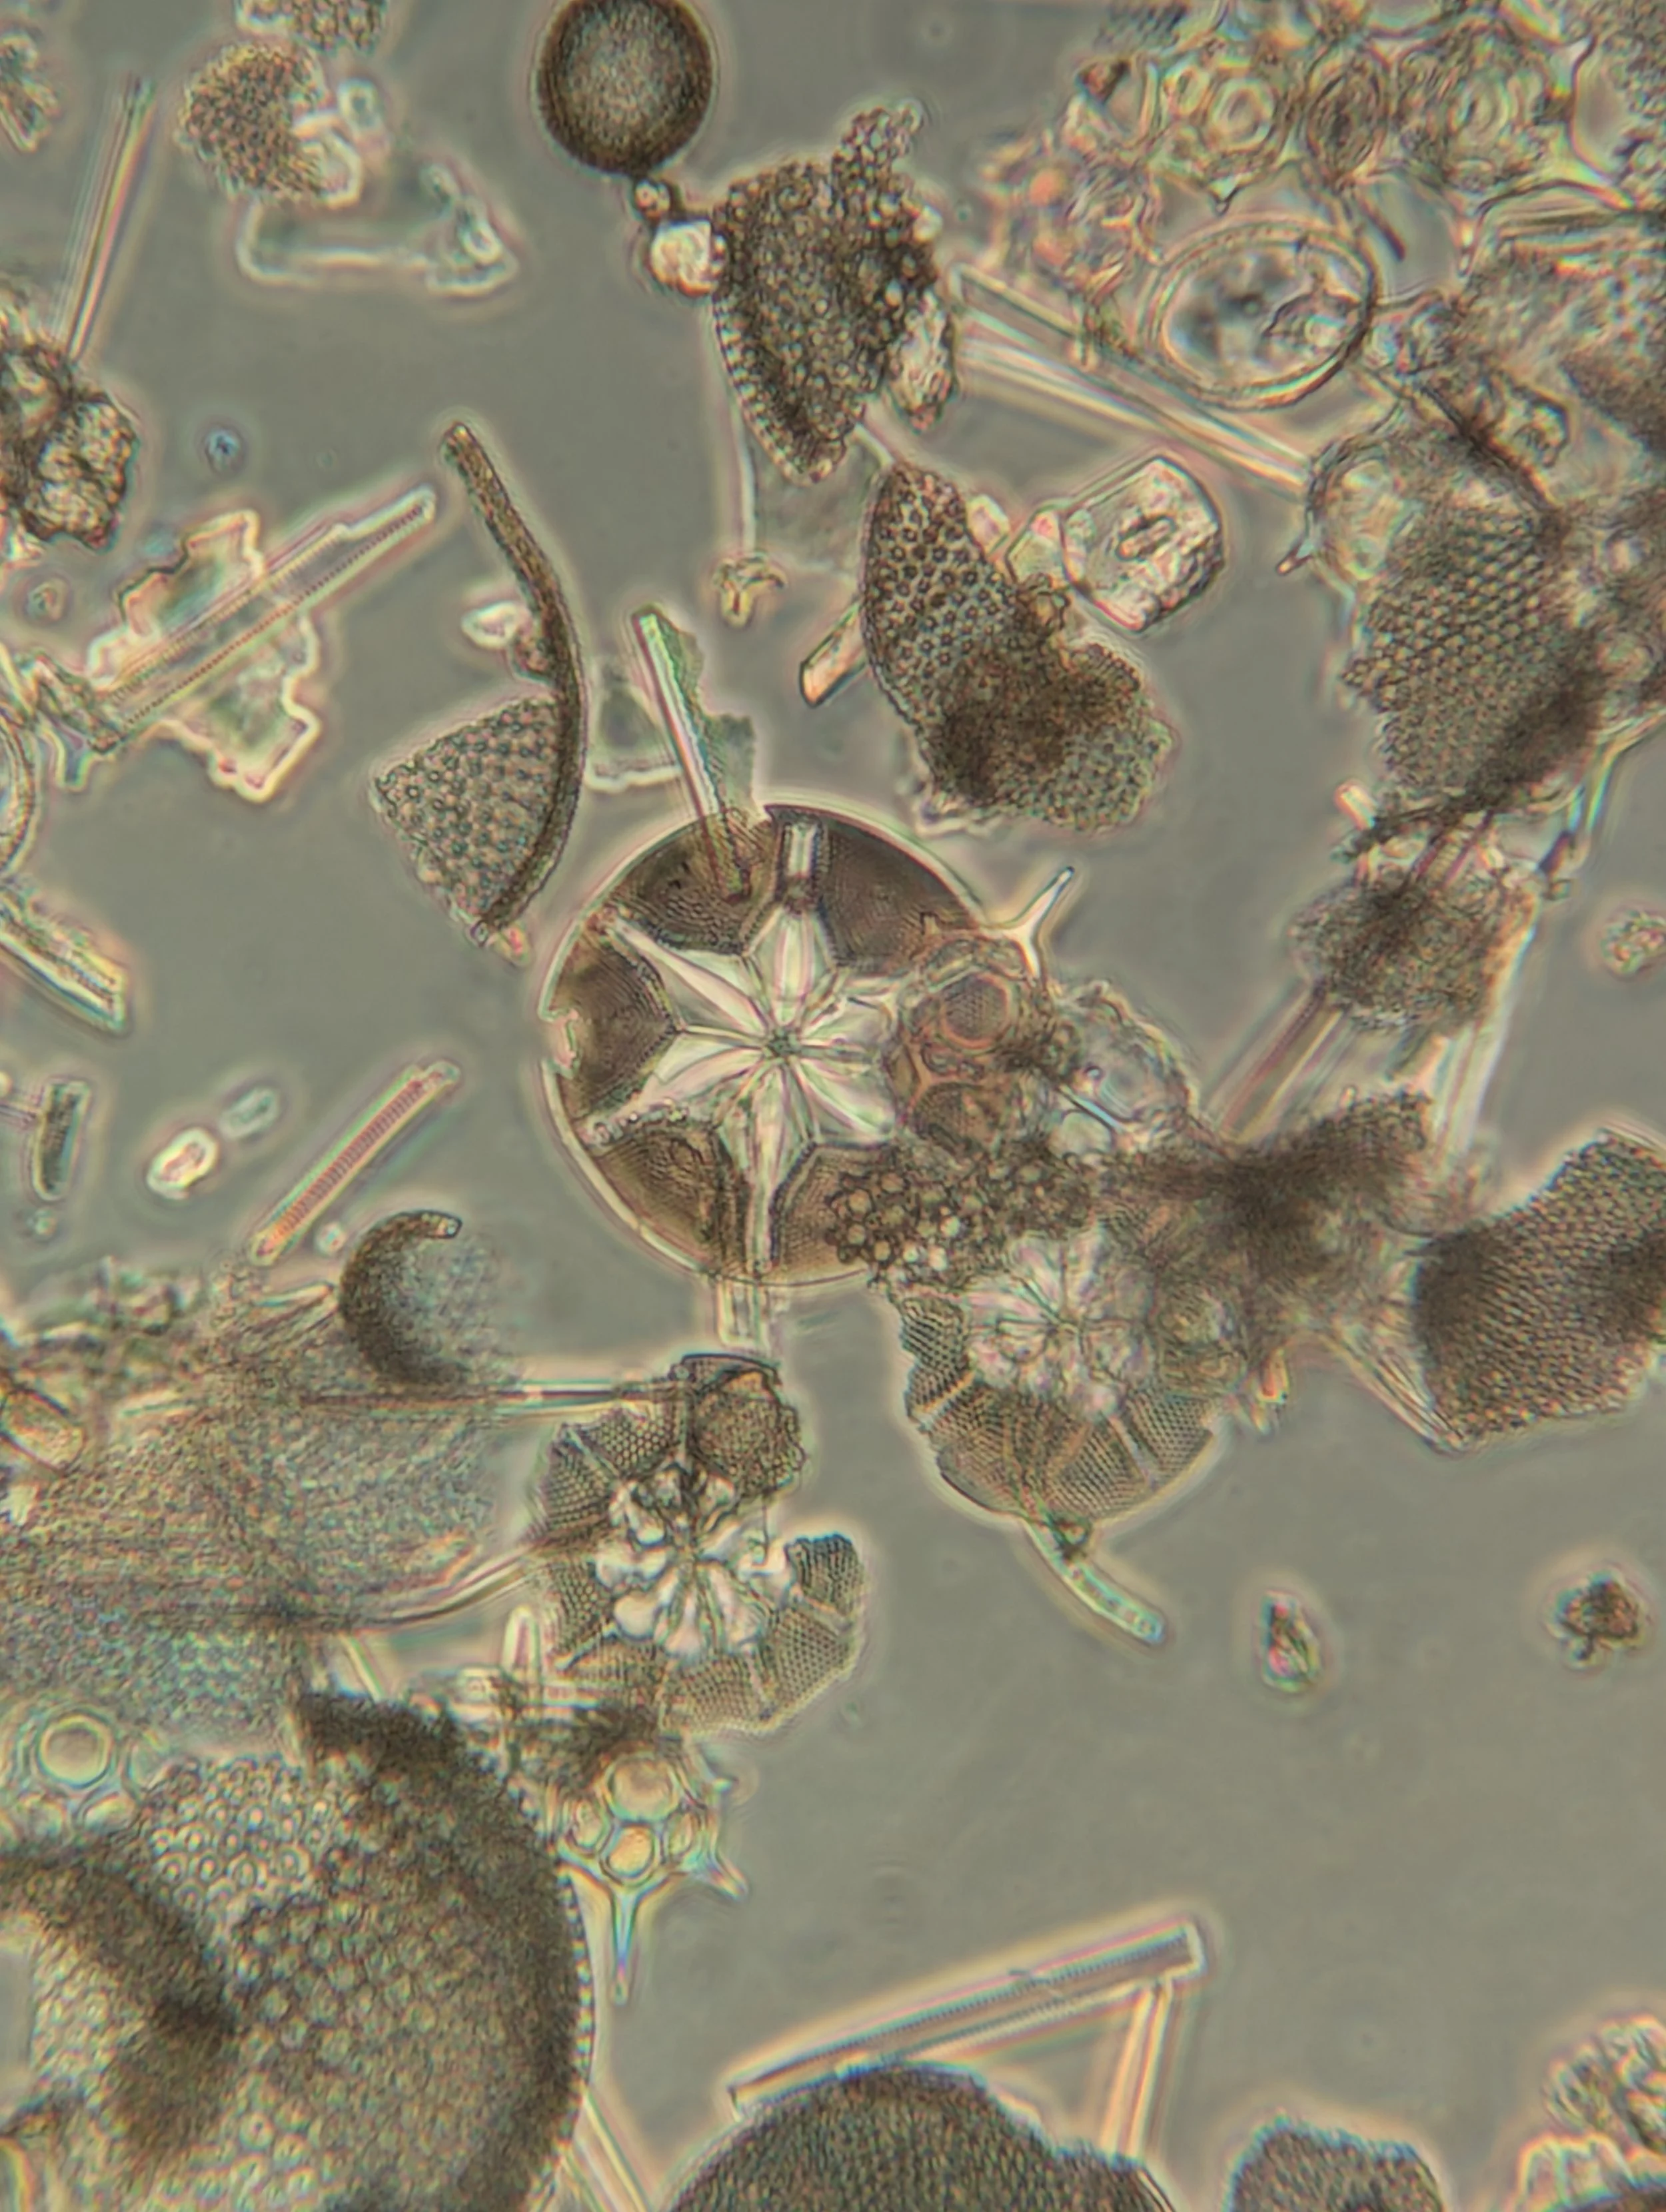
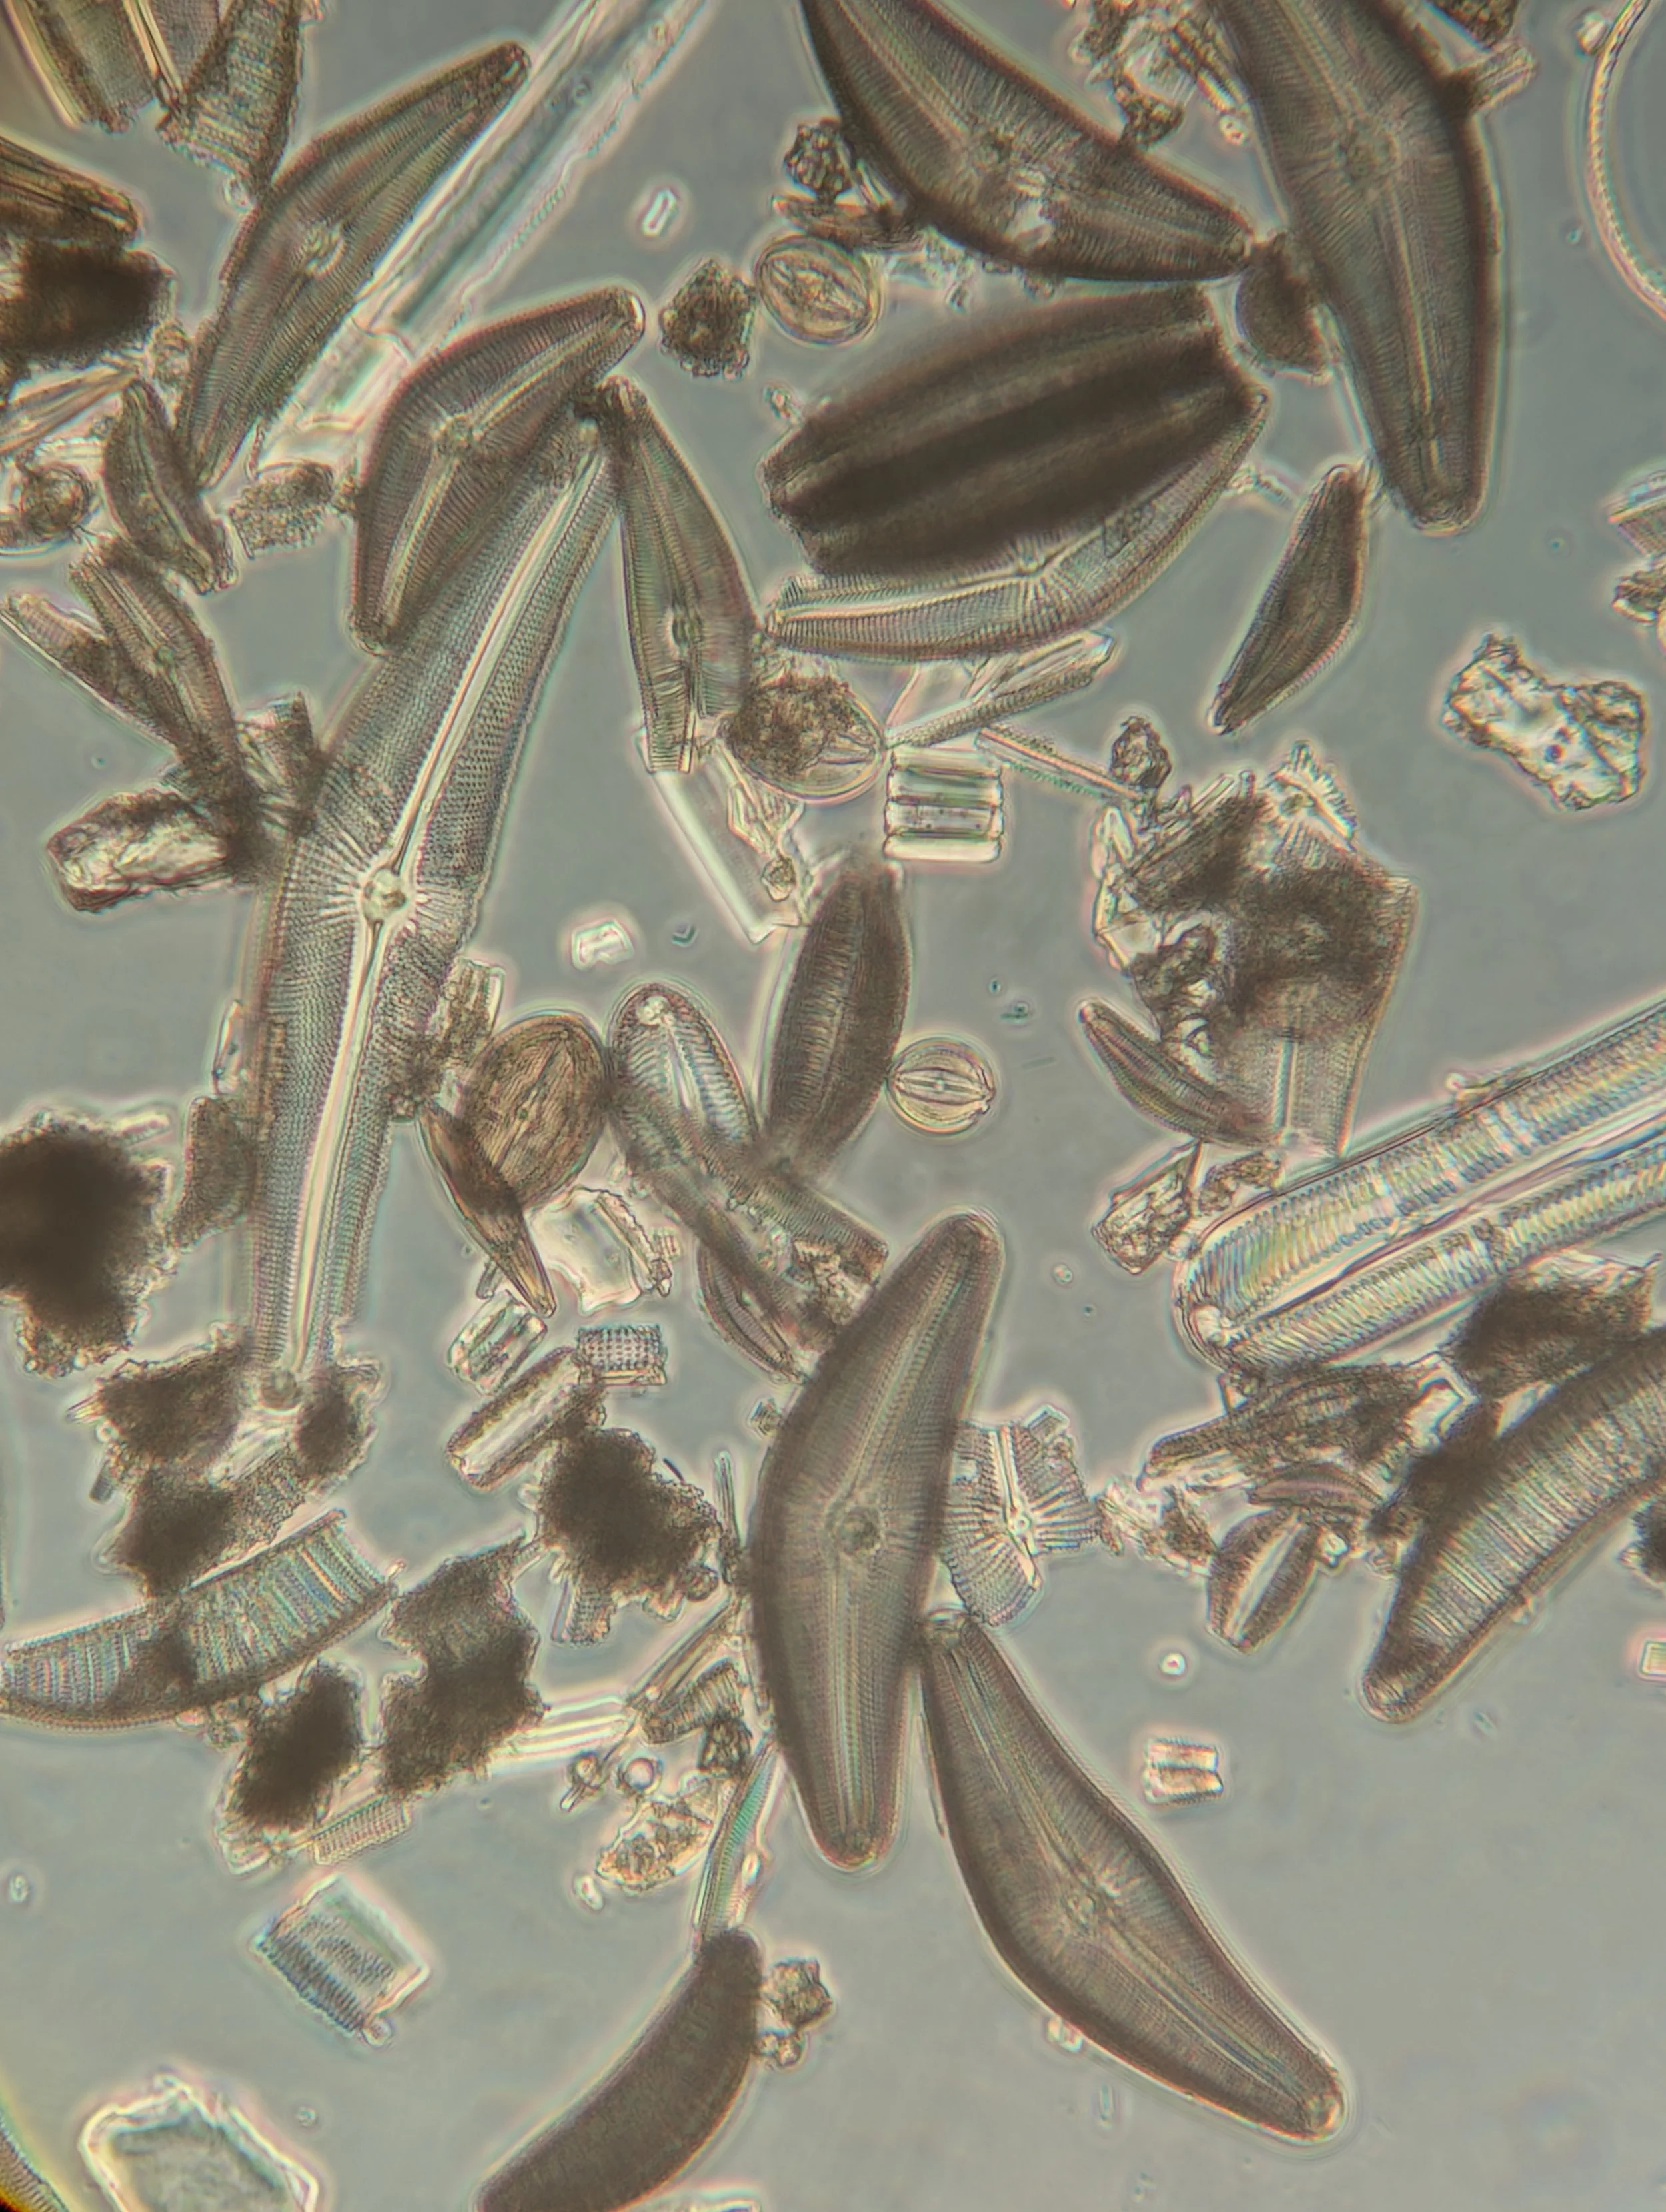
(and 7) Clean diatom valves from the sample under the microscope
1.
2.
3.
4.
5.
6.
7.