Clive’s Corner #15: Photomicroscopy - The Basics
The emergence of digital photography a few decades ago opened up several new ways to record images of specimens seen under the microscope. This edition of the Corner will explore one option, with the usual emphasis on inexpensive procedures that the hobby microscopist can use. But first, it is useful to outline the optics of a microscope as in introduction to possible routes. The simplest microscope consists of two sets of lenses – the objective and the eyepiece. The objective lens may form a primary image directly (as in fixed tube length microscopes) or via an additional tube lens (as with infinity-corrected objectives). The primary image is then viewed via an eyepiece, which acts as a magnifying glass to produce a further-magnified virtual image of the primary image. Light from the sample effectively leaves the eyepiece as a parallel beam which our eye lens then focuses on the back of the eyeball to give a real image at the retina. There are essentially three basic ways to record a photographic image with a camera sensor (or film) as shown in Figure 1: a) The sensor is used in conjunction with the camera lens to view the primary image through the microscope eyepiece – the so-called afocal method, b) The sensor is placed at the position of the primary image, c) The eyepiece lens is moved upwards along its optical axis by a few centimeters, or replaced by another tube lens, to form a secondary real image where the camera sensor is placed. Each of these methods has its advantages and disadvantages, providing enough material for more than a single Corner article. In this article I will discuss method (a) which is potentially the cheapest method, assuming the microscopist already has a smartphone or digital camera.

Figure 1. The three basic arrangements for connecting an imaging sensor to a finite tube-length microscope. (a) The afocal method where a camera and its sensor replace the position of the eye lens and retina. (b) Primary image capture. (c) Use of a tube lens to form a secondary image at the sensor position. The eyepiece lens itself can be used as a tube lens by raising its position in the eyepiece tube. Similar arrangements can be used for infinity microscopes where the light leaves the objective lens as a parallel beam and an additional tube lens brings it to focus at the primary image plane
When considering digital photomicroscopy options, there are three important factors: 1) the optics, 2) the mechanics of mounting the camera and 3) the number of pixels required so that the resolution is not limited by the camera. The last point was discussed in a previous article, and depends on several factors including, the sensor size and numerical aperture of the objective. In practice, 10 MP should be sufficient to cover the full field-of-view in most scenarios. However, fewer pixels are required if only a limited field-of-view is captured, as is the case with most USB eyepiece cameras.
First, the good news about the afocal method. Different manufactures use different ways to compensate for objective lens aberrations via the eyepiece lens. When the microscope objective is used with its own eyepieces, image aberrations are minimized. Likewise, when the camera lens is set at its infinity focus position relative to the sensor, it minimizes aberrations. The downside optically is that there is a lot of glass in the light path, which may present a problem for applications where photon detection efficiency is critical. This is not likely a factor for most hobby applications. More of a problem can be the size mismatch between the diameter of the camera lens (typically > 30 mm for a single-lens reflex (SLR) camera) and the diameter of the eyepiece lens which may be around 15 mm for hobby microscopes. This is less of a problem for compact cameras and no problem for smartphone cameras which have lens diameters of less than 10 mm.
The mechanics of attaching the camera to the eyepiece can be challenging. Smartphones can simply be held manually close to the eyepiece, but it takes practice to get the image to line up on the smartphone and hold it steady while taking the photograph or movie. A Google search reveals many brands of microscope cell phone holders priced from $7 to $70, most of which are designed to secure the smartphone body in a clamp (Figure 2). The phone is first mounted in the clamp so that the phone camera lens is centered on the eyepiece holder. Other holders come with sticky suction pads, which are useful at outreach events where different individuals can quickly rest their phones above the eyepiece. This option works well when an eyepiece and holder are moved to the trinocular port such that the suction pad is horizontal. However, when used in the normal eyepiece position, the pads do not hold the angled phone stably and it needs a helping hand to stop it slipping down. Nevertheless, the holder does help keep the phone at 90° to the eyepiece. A crucial factor of any holder is that the distance between the phone lens and the eyepiece lens can be adjusted. Ideally, the phone lens is positioned at the exit pupil of the eyepiece which typically is the order of 10 mm above the eyepiece. This allows the full field-of–view to be captured. Even with the use of a holder, the weight of the phone may cause a loose-fitting eyepiece to tilt slightly in the eyepiece tube, so some manual intervention may be required.

a)

b)

c)
Figure 2. Smartphone holders (a) Fixed and adjustable eyepiece holders with clamps and an adjustable eyepiece holder with suction pad support. (b) adjustable holder showing the phone lens about 10 mm from the eyepiece lens to maximize the field-of-view. (c) Suction pad holder mounted on an eyepiece in the trinocular port with a smartphone resting horizontally
One of the challenges of using a smartphone with a microscope is the activation of the shutter without jogging the phone itself. Here, I learned a useful trick from a fellow plankton enthusiast. When taking photographs she would say “smile” to each organism that came into view. Now, I know plankton are captivating subjects, but I thought this was taking things a bit too far, until she told me she had set her phone camera to be voice-activated. I checked with my iphone instructions and found that custom commands can be given such as “Hey Siri, say cheese” to take snaps or activate a video. This leaves two hands free for holding the camera and gently tapping the yellow auto-focus square when the sample is in view.
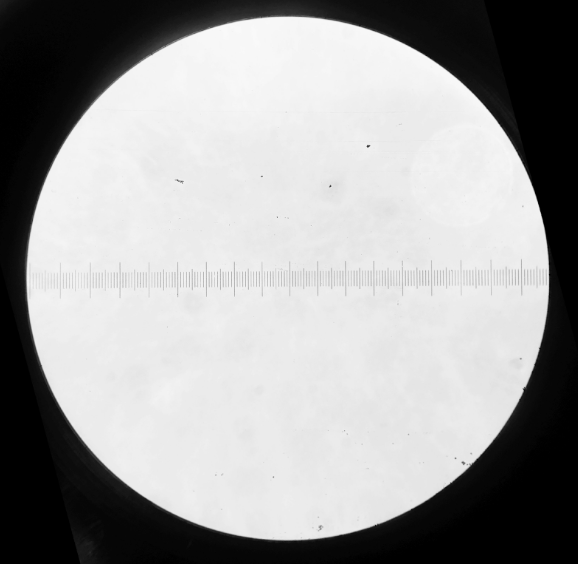
While smartphones provide a cheap way to record images, they have some draw backs in that zooming in on an object to fill the field-of-view makes it difficult to keep track of the actual magnification, unless the microscope has an eyepiece graticule. With phones having multiple cameras, it is useful to check which can best be used to capture the full field-of-view as seen by eye, with minimal zooming. This setting can be calibrated using a slide graticule and scale bars added subsequently to the photos using a program such as ImageJ. Figure 3 shows images of a slide graticule obtained using an iPhone in the set-up shown in Figure 2b. The phone camera captures the full field-of-view of the 10x eyepiece and is only slightly less sharp at the periphery compared with the center.
a)

b)

c)
Figure 3. Slide graticule (10µm per small division) photographed with an iPhone using a phone holder (Fig. 2b) mounted on an Amscope 120 compound microscope with a 10x objective lens and a 10x eyepiece. (a) Full field-of-view (180µm) was similar to that seen by eye. (b) Enlarged image showing central region. (c) Enlarged image showing edge of graticule.
Small point-and-shoot cameras can also be held above the eyepiece for a quick snapshot, but full-sized cameras are less satisfactory because there is a mismatch in lens diameters. Consequently, the eyepiece tube limits the field-of-view and reduces the effective aperture of the camera lens (Figure 4). One option is to replace the microscope eyepiece with a telescope eyepiece which has a larger diameter. I have on old EagleEye eyepiece designed for “digiscoping” with a terrestrial telescope, that has a 30 mm lens diameter that works well. However, attaching this eyepiece to the microscope required some additional thread adapters which will be discussed in a future Corner along with other methods of taking photographs through a microscope.

a)

b)
Figure 4. Microscope graticule as in Figure 3 but photographed using a hand-held Nikon 3000 dSLR camera and a 10x eyepiece. (a) The field-of-view was restricted to central 110 µm cf. 180 µm seen by eye. (b) Enlarged central region of photograph.