Taking a walk on the dark(field) side
Clive’s Corner by Clive Bagshaw
A feature of MicroNews, Clive’s Corner is a place created for the sharing of knowledge, tricks, and tools. The Corner is where you read about clever microscopical hacks - and submit your own. Clive’s Corner is the namesake of SFMS Member Clive Bagshaw, who has spent a lifetime looking into microscopes - including 50 years studying protein reactions.
In this Corner: This is installment #2 of Clive’s Corner, and a continuation from the Winter 2021 MicroNews article introducing hacks that beginners can explore on inexpensive microscopes.
One of the simplest hacks for a basic brightfield microscope is to place a patch stop beneath the condenser to achieve darkfield illumination so that objects of interest shine brightly on a dark background. Small features that are hard to see under normal lighting conditions can stand out under darkfield illumination – including dust and fingerprints, so clean your slides carefully. The method works well for objective lenses with numerical apertures of around 0.65 or less, which in practice means up to around 40x magnification. The condensers of expensive microscopes come equipped with filter holders built into a rotating turret and they may already contain a range of patch stops intended for phase contrast microscopy that can also be used for darkfield illumination. Inexpensive microscopes may have a single swing-out filter holder beneath the condenser. My Amscope 120 and Swift 350 compound microscopes have a holder for 32 mm filters and came supplied with a blue filter intended to give best resolution by reducing chromatic aberration. If your compound scope is really cheap and has no filter holder (or condenser) or you are using a stereo microscope, you will have to be more inventive (or wait for a future Corner article) to generate darkfield illumination.

Condenser with swing-out filter holder (left) and darkfield patch stop in holder (right).
To make a patch stop, cut out a 32 mm diameter circle (or that appropriate for your filter holder) from a clear plastic food container. Then cut out a smaller circle from black electrical tape. The diameter of the back circle required depends on the numerical aperture of the objective lens, so make several filters accordingly. On my ‘scopes I use 11 mm diameter for a 4x 0.1NA objective, 18 mm for a 10x 0.25NA objective and 22 mm for a 40x 0.65NA objective. Cutting out these circles is easier if you have a template to cut around. I use a coin, such as a dime for the 18 mm patch stop. Finding a 32 mm diameter coin is a bit more challenging – I use a 1990 Mexican $1000 coin found in my loose change from a past holiday (worth about $1 US in today’s money). Once you have cut out the black patch, stick it in the center of the 32 mm transparent plastic piece – and that’s it. Place the patch stop in the filter holder, swing it under the condenser, open the condenser iris to maximum and turn up the lamp brightness until you see the sample glowing on a dark background. You may need to adjust the condenser height to achieve optimal illumination. If the patch stop is too small, the background will not be completely dark, while if it is too big you will lose a bit of intensity. It follows the circle does not have to be perfect, as long as it satisfies the darkfield criterion at its narrowest diameter. Likewise, if the black patch is slightly off-center, it does not matter too much as long as it is a bit larger than the minimum diameter for the particular objective lens. Holding the patch with tweezers as you lower it down on the transparent disk is the easiest way to get it centered. In general, the method works well for 4x and 10x objective lenses but is more challenging to setup with a 40x lens. Putting immersion oil between the condenser lens and the microscope slide can give a bit more peripheral illumination for higher NA objective lenses.
The patch stop works in conjunction with the condenser by producing a cone of light such the direct (brightfield) path is blocked, but some of the light reflected or scattered by the sample enters the objective lens (see Figure). Using different color filters for the outer and inner patch stop generates Rheinberg illumination, used for various artistic effects.

When moving the filter holder into position while looking through the eyepieces, you may have noticed that the edge of the filter holder casts a shadow across the image, and that objects within this shadow take on a 3-dimensional appearance. This is oblique illumination which provides images somewhat like those of differential interference contrast. The effect is also achieved by moving the condenser or light source off-center, but this is not very practical. Oblique illumination refers to the condition where the light illuminates the sample from one side and refractive boundaries, such as cell walls or membranes, show up because they appear bright along one edge and cast a shadow along the other edge. Different-shaped masks positioned in the filter holder or between the light source and condenser give different effects. You can buy such masks on eBay or make your own using black electrical tape. Here is one such advert from eBay, for a 35 mm diameter filter holder.
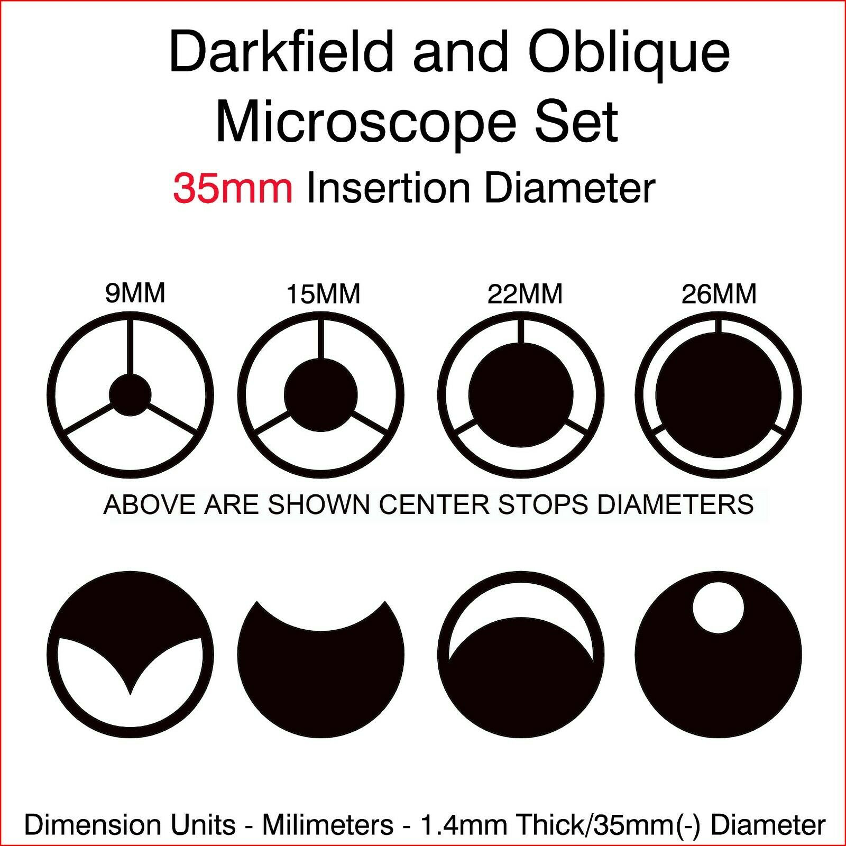
Example of a darkfield and oblique microscope mask set available for purchase.
Even just a straight edge, such as a piece of card, resting halfway way across the light source can be quite effective at generating oblique illumination (open the condenser iris about halfway). One problem with this simple trick is that the oblique illumination effect is only seen along the edge of the shadow, while one side of the field appears as normal brightfield and the other side approaches darkfield illumination. This might not be a problem if you are using an inexpensive lens-less USB camera which records only the central part of the field, but to get the oblique effect to cover the full field-of-view, as seen by eye or a more expensive camera, is more challenging. One way to solve this problem is to place the blocking mask on top of the light source, then put a diffusing filter in the condenser filter holder. A diffusing filter can be made by sticking one or two layers of translucent Scotch tape on a transparent plastic disk cut out from a food container as described for darkfield illumination. Alternatively, if you are lucky, you may find an appropriate translucent plastic lid on a yoghurt pot. The diffusing filter spreads out the shadow from the mask edge and extends the oblique illumination effect over a larger field-of-view. This trick is known as Dodt contrast illumination. You may need to experiment with different diffusers (different levels of translucency) to get the desired effect. Below is an example of the different kinds of illumination for a worm collected from the Santa Cruz Wharf on September 11, 2020, obtained with my Amscope 120 microscope.
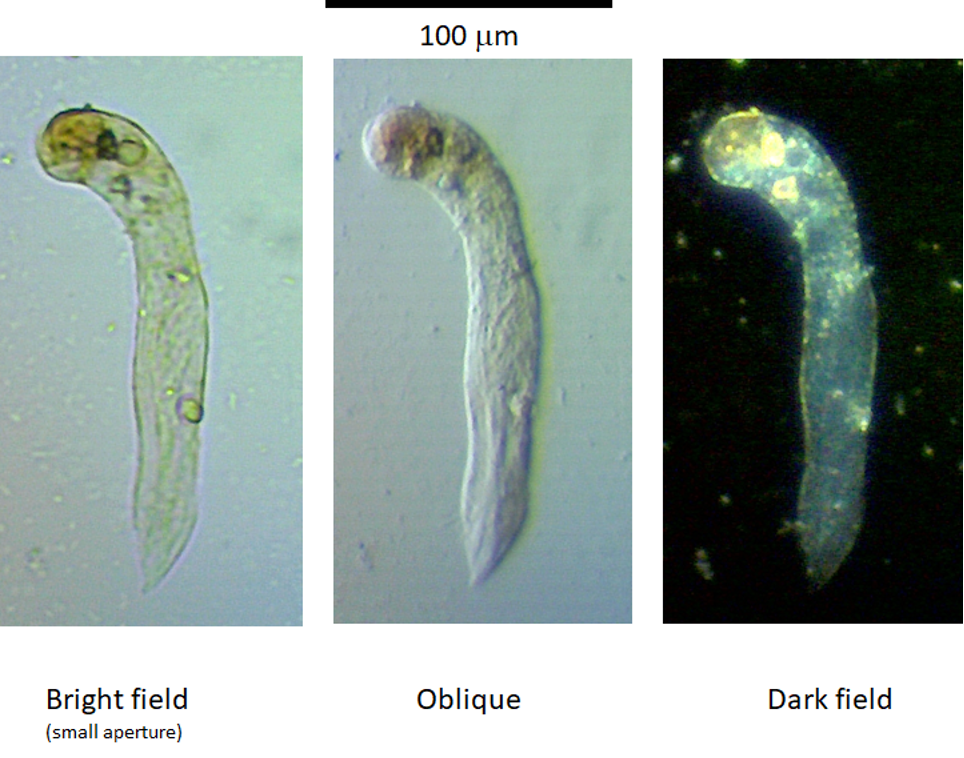
Worm collected September 11, 2020 from marine waters off of the Santa Cruz Municipal Wharf, as viewed with different illumination techniques.
Note that the brightfield image was obtained with the iris fully closed to achieve maximum contrast. Individual structures have a dark line surrounding them, so-called Becke lines, which are a diffraction artifact. In some circles, notably amongst the wide-aperturist party, images with Becke lines incite the comment that they are a sure sign of on an amateur microscopist at work. However, the same people will pay good money to generate artifacts using phase contrast and differential interference contrast. On the other hand, if by amateur they mean doing it for love rather than money then I agree 100%.