Clive’s Corner #17: Photomicroscopy – Custom Solutions
The last two postings on “The Corner” concerned ways of taking photos through a microscope eyepiece (i.e. the afocal method) or directly at the objective primary image plane. Here, I consider a third option, the eye-piece projection method (Figure 1a), as well as some other custom solutions for providing a wide field-of-view. With the eye-piece projection method, the supplied 10x Amscope microscope eyepiece (focal length 25 mm) is raised so that the primary image is brought to a focus to give a real secondary image, rather than parallel light being emitted so that the our eyes form a real image on the retina. By raising the eyepiece by 25 mm, so that the total distance of the primary image to the lens is 50 mm, a real secondary image is formed at 50 mm above the eyepiece and will be the same size as the primary image, as evident from the basic lens formulae:
1/f = 1/u + 1/v , where f = focal length, u = object to lens distance and v = lens to image distance.
i.e. 1/25 = 1/50 + 1/50 = 2/50
m = v/u , where m = magnification = 50/50 = 1.
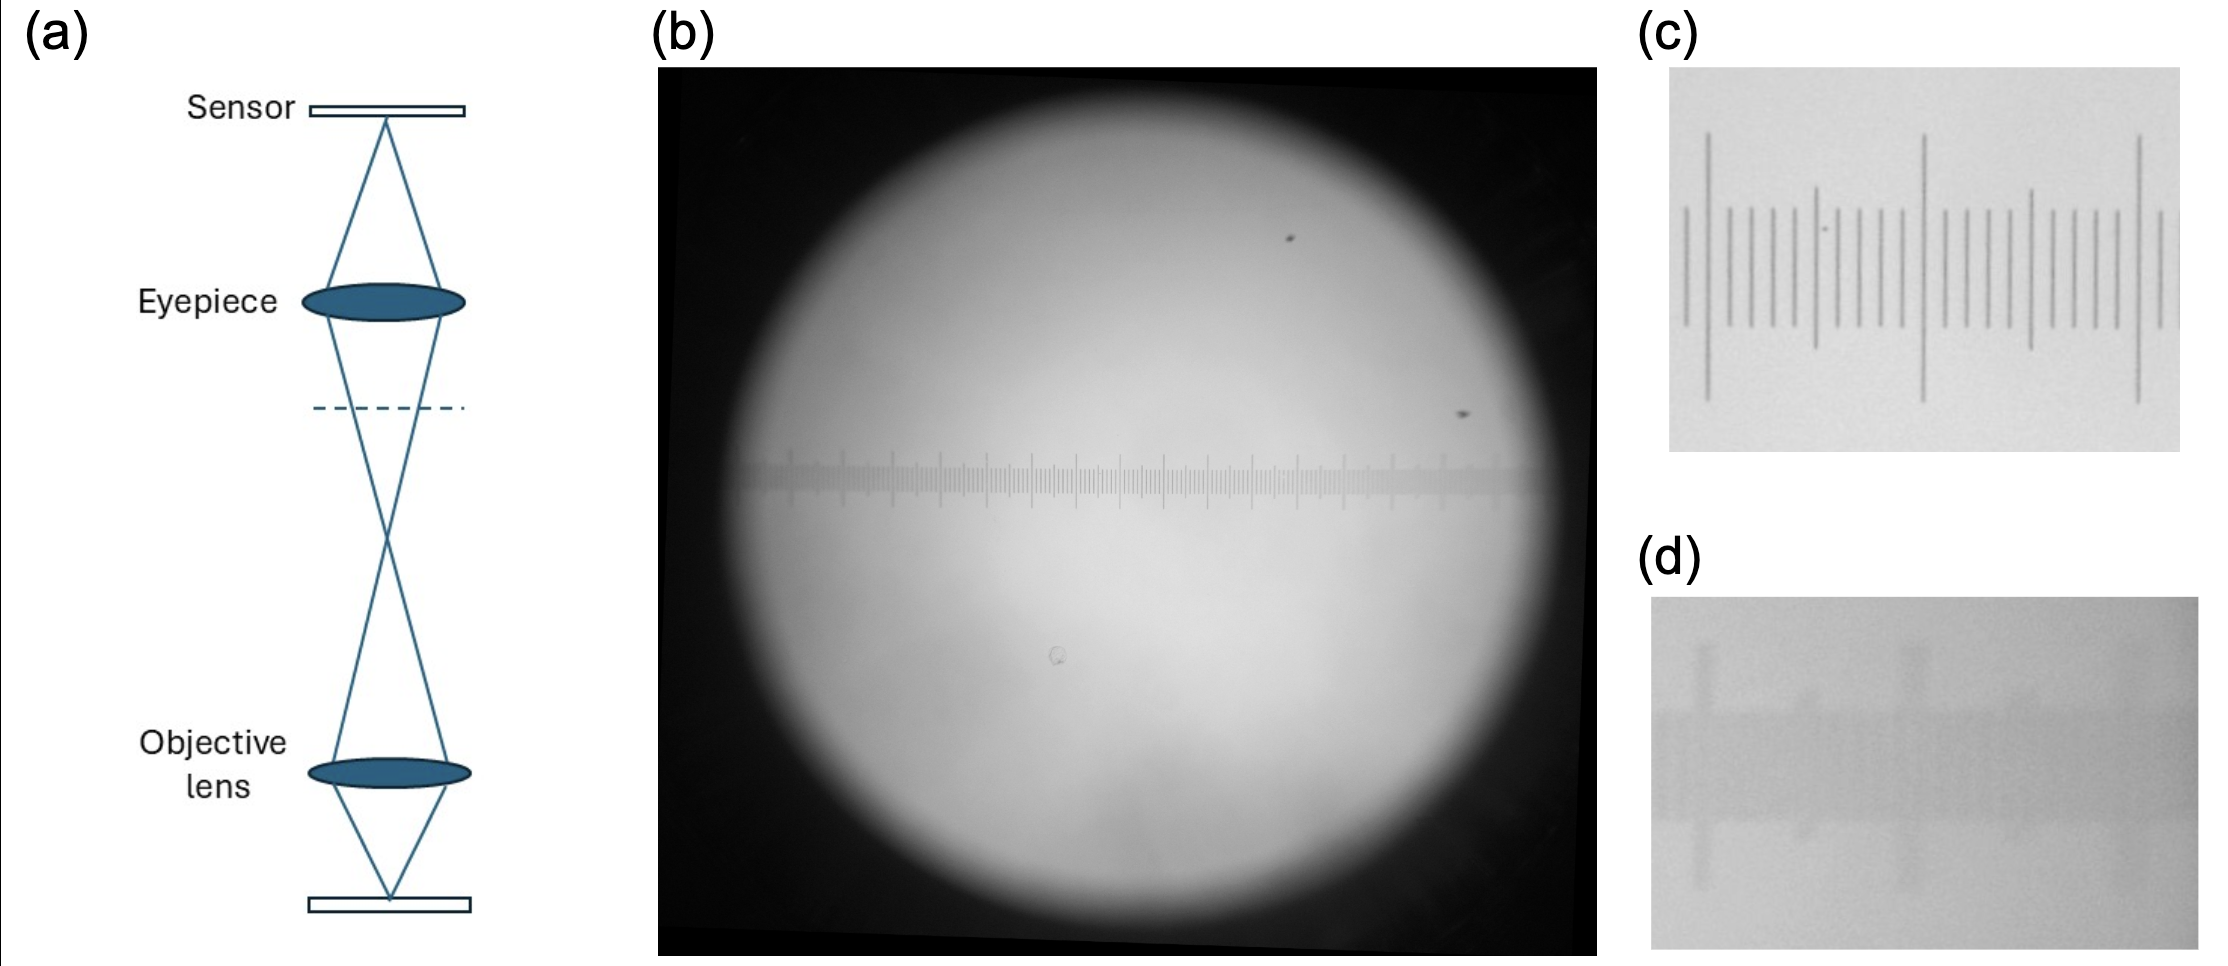
Figure 1. (a) The eyepiece projection method where the eyepiece is raised above its normal position indicated by the dashed line. (b) The resultant image captured by the sensor of a Lumix 4/3 camera showing field-of-view of 17 mm at the image plane. Close ups of graticule at (c) the center and (d) the edge of image
Figure 1b bears out this calculation and achieves a full field-of-view (~18 mm). However, the image quality is poor at the periphery (Figure 1c,d). This result was not unexpected because the supplied eyepiece is designed to work at a position of one focal length from the primary image to correct for aberrations in the objective lens (i.e. u = 25, v = ∞). Dedicated eyepiece projection lenses are available for some high-end microscopes. An alternative hack is to separate the lenses within a standard eyepiece, which helps correct for aberrations when used for projection, but this option was not readily achieved with my Amscope eyepiece without complete disassembly. Raising the eyepiece by a smaller distance would give less problems with aberrations, but now the secondary image would be magnified, and the full field-of-view would not be captured by the camera sensor. For example, raising the eyepiece by 5 mm, would give u = 30 mm, v = 150 mm and m = 5. However, in this case, it would be simpler to capture the primary image directly where the quality at the center of the field is acceptable, as illustrated previously.
So, with the eye-piece projection method ruled out, this left us with a problem – at least for those of us with hobby-grade, 160mm tube-length microscopes. The microscope eyepiece lens diameter of about 15 mm diameter works fine in the afocal mode with a smartphone camera but it is too small to match the lens diameter of full frame or 4/3 frame cameras. As a result, the image suffers from vignetting (shading or blocking the corners, so restricting the field-of-view). On the other hand, using such cameras with their sensors positioned at the primary image plane captures the full field-of-view because the sensor size is a good match to the primary image size (around 22 mm diameter). But now the image quality is poor at the periphery because the microscope objective lens is designed to function in concert with its eyepiece to correct for optical aberrations.
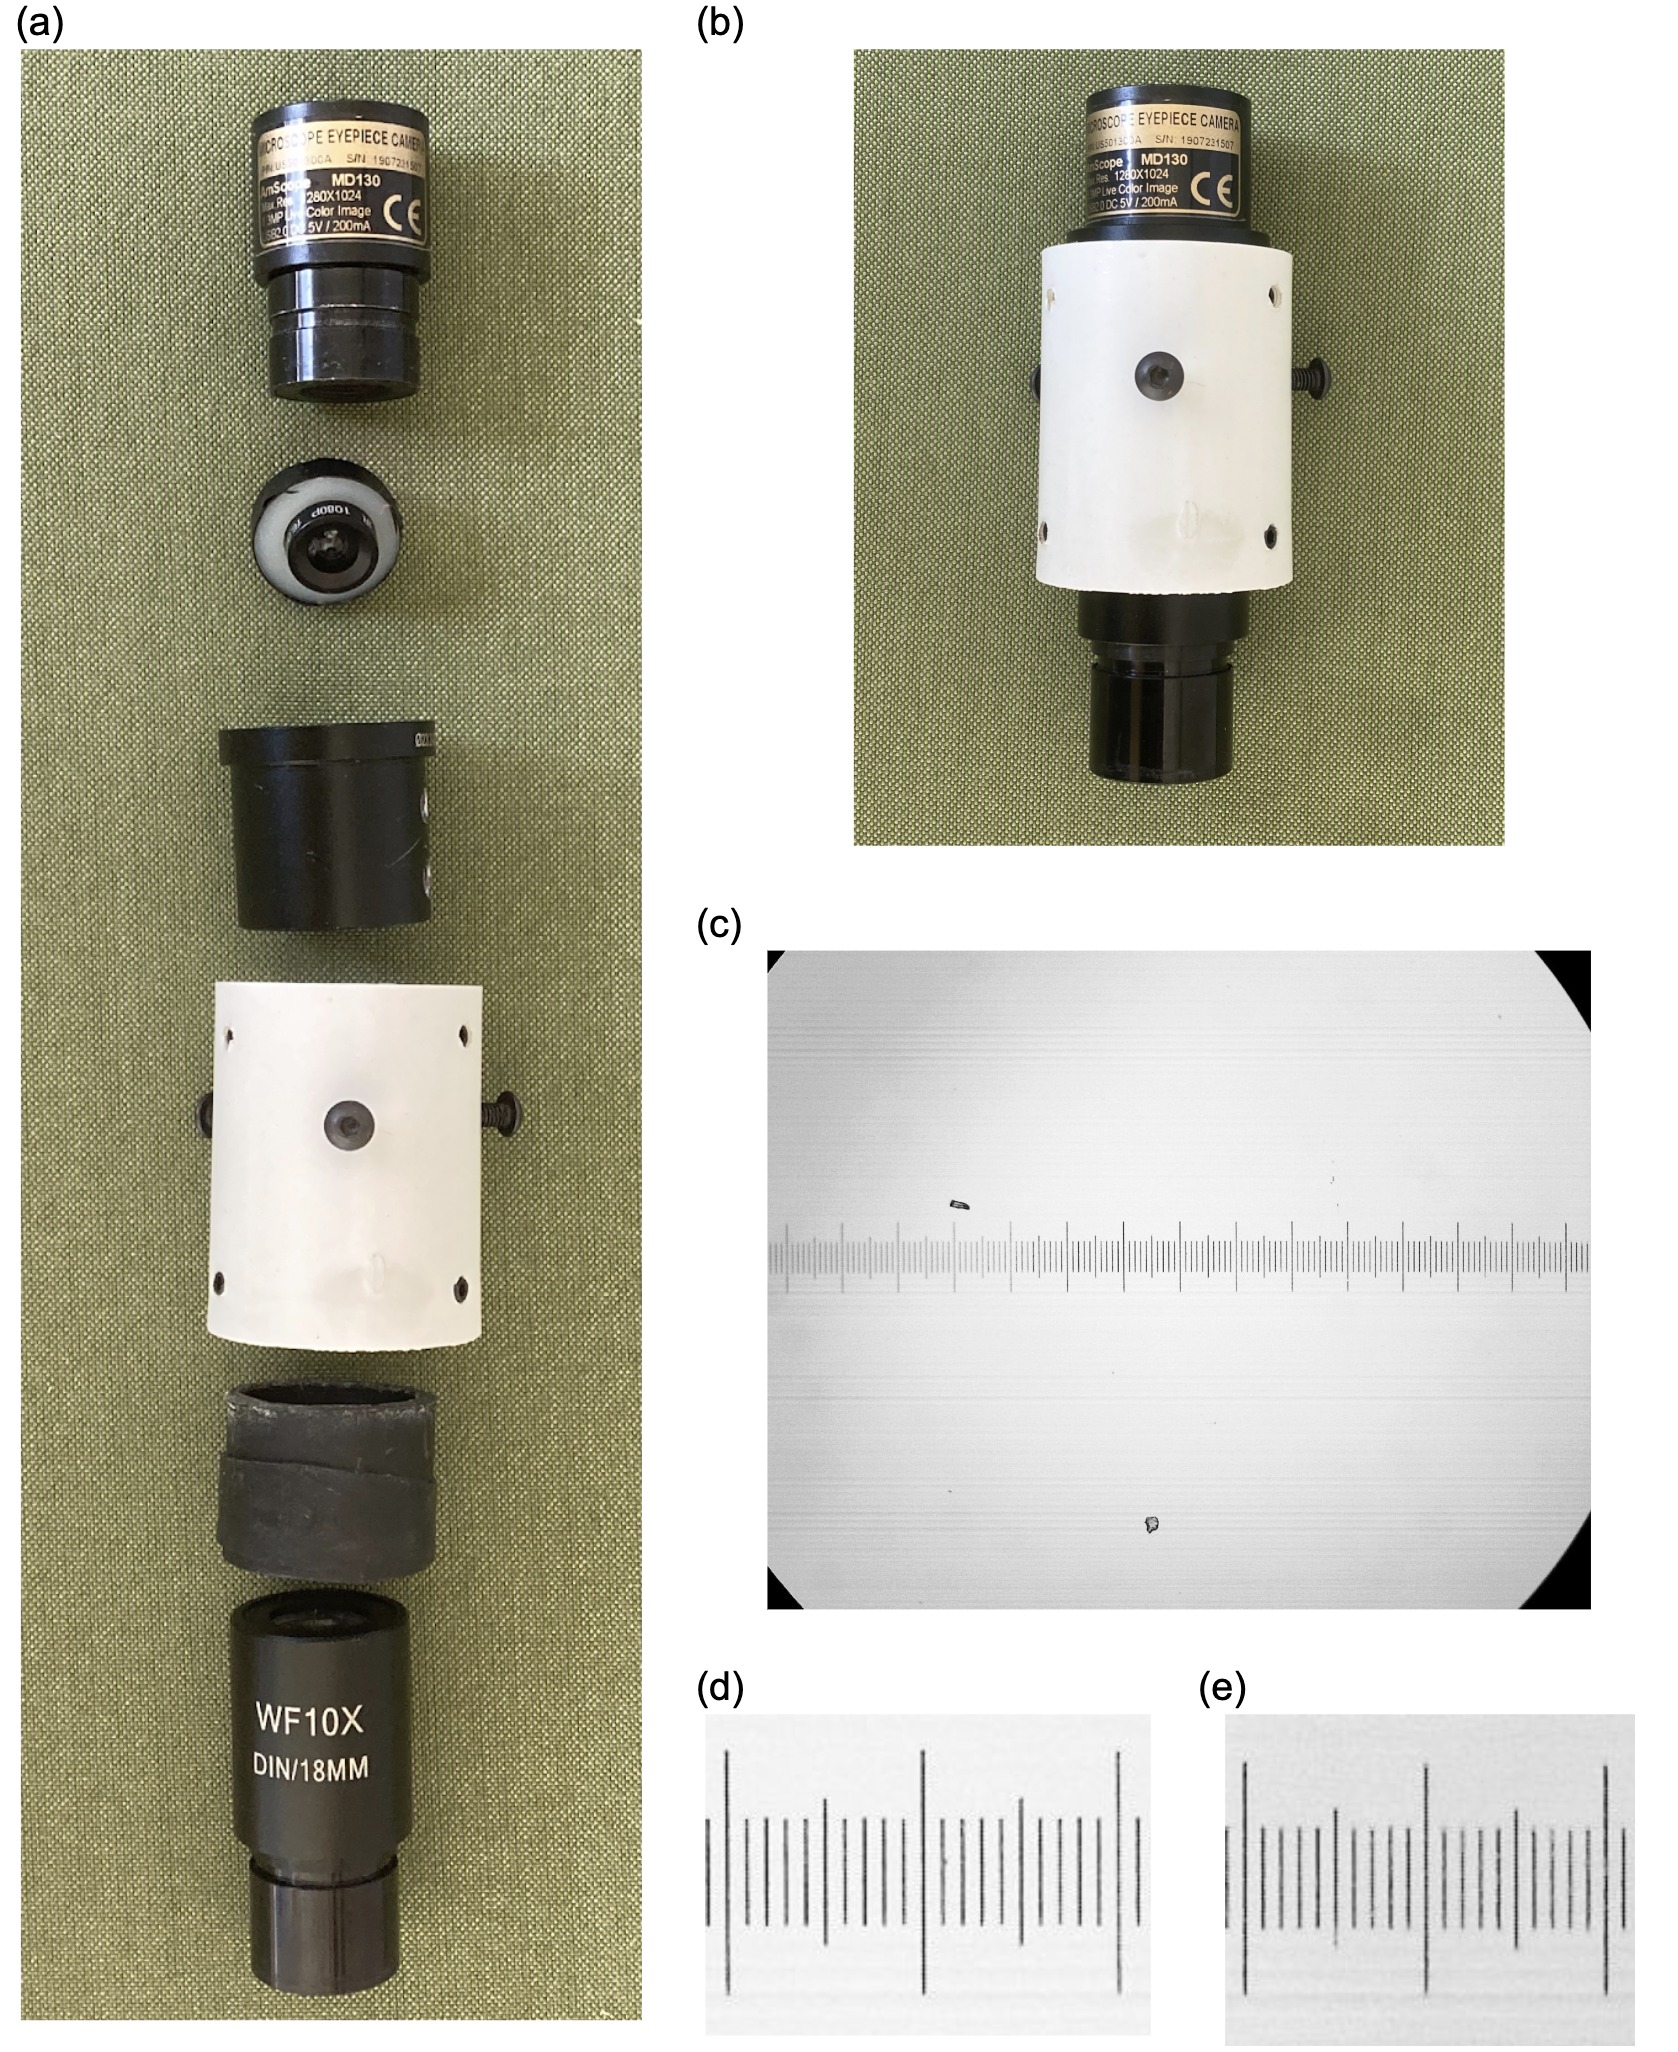
Figure 2. (a) Exploded view of components for attaching a USB camera to 10x microscope eyepiece, with an intermediate 6 mm focal length CCTV lens mounted in a 23 mm collar, a 23.5 to 30 mm eyepiece adapter, 1.5 inch PVC conduit with centering screws and a 32 mm shim to make a good fit to the eyepiece outer barrel. (b) Assembled optics with the CCTV lens 6 mm from USB camera sensor and the 10x eyepiece barrel projecting below. (c) Graticule full field-of-view = 14.8 mm. Expanded view of (d) center and (e) edge of the graticule image.
One way of capturing a wide field-of-view is to add a lens to a USB camera with a small sensor so that it can be used in the afocal mode with the standard 10x microscope eyepiece. Normally, such a USB camera is positioned in the trinocular tube at the primary image plane, but the small sensor only captures about 1/5th the field-of-view seen by eye (see Figure 2b of CC#16). A suitable lens for afocal photomicroscopy is a 6 mm focal length CCTV lens. The lens can be mounted in a 23 mm diameter collar from a local hardware store and fixed within a 23.5 to 30 mm eyepiece adapter using a grub screw and tapped hole in the adapter. The lens is positioned at a distance of 6 mm (i.e. one focal length) from the USB camera sensor so that it gives a sharp image of objects near infinity. This can be checked by plugging the USB camara into a computer running the Amscope software and adjusting the lens position until distant objects are in focus. The adapter-lens combination is then fixed within a 1.5 inch diameter conduit connector (available at hardware stores) using three screws and tapped holes to aid centering. Finally. a shim is cut from a plastic tube (e.g. vacuum cleaner pipe) of about 32 mm diameter to form a snug fit between the bottom of the conduit connector and the top of the eyepiece barrel. These components are shown in an exploded view in Figure 2a and an assembled view in Figure 2b. The bottom of the eyepiece barrel is then inserted into the trinocular port and the camera connected to the computer via a USB cable.
This lens combination gives a field-of-view of 14.8 mm compared with 3.6 mm when such a lens-less USB camera is positioned at the primary image plane. The image quality is comparable to those obtained with a smart phone used in the afocal mode (see Figure 3 of CC#15). Advantages of using the USB camera include the additional options available in the Amscope computer software such as adding a scale bar and using the extended depth-of-field (EDF) option to achieve focus stacking in real time. I find this customized adapter useful when monitoring plankton. I usually use the USB camera in the standard primary image mode with a 10x objective lens. Here, the small field-of-view effectively zooms in on any organism in the center of the field, while the view by eye through the binocular eyepieces gives a bigger field to search. Occasionally an interesting zooplankton of a millimeter or so in size will appear in view, too big to capture even when shifting the objective lens to 4x or 2x. In this case the USB camera can be lifted out of the trinocular port and the afocal adapter inserted in its place and the USB camera returned to the top of the adapter for a quick snapshot or video.

Figure 3 (a) EagleEye eyepiece and (b,c) adapter for attachment to camera lens via its filter thread.
Better quality images are obtained with larger frame cameras, such as dSLR and mirrorless cameras, but these require a large diameter eyepiece that matches the camera lens diameter and fits on to the microscope head. A few decades ago, before phones came with quality cameras, eyepieces were made for to attach SLR cameras to telescopes for Digiscoping and were popular with bird photographers. These eyepieces were low power (around 10x magnification = 25 mm focal length) but had a wide aperture. At that time, I acquired an Eagle Eye Ds Eyepiece (Figure 3a) with a 30 mm diameter lens and a 37 mm thread to attach it to a telescope body via a 37 to 42 mm T2 adapter. This eyepiece is no longer made but occasionally appears on the secondhand market. The eyepiece was supplied with an adjustable adapter (Figure 3b,c) that could be clamped around the eyepiece and allowed attachment to a camera lens via its filter thread. Using a 37 to 52 mm stepping ring, this allowed attachment to the lens of my Nikon D3000 dSLR.
To assemble the combination, the Eagle Eyepiece is first attached to the trinocular port of an Amscope 120 microscope using T2 extension tubes and a series of stepping rings as described in the previous “Corner” article. The combined extension tube length (5 + 25 mm in this case) is chosen so that the Eagle Eyepiece is parfocal with the binocular eyepieces. Observation through the EagleEye Eyepiece shows a field-of-view of about 22 mm, compared with 18 mm for the supplied microscope 10x eyepiece. The dSLR camera, with the adapter attached to a 16-55 mm f.l. Nikkor lens focused on infinity, is then placed over the Eagle Eyepiece (Figure 4a). The camera can be zoomed-out to view the full circular image seen by eye, or zoomed-in to obtain a rectangular field within the observation circle. A similar optical combination can also be used with a JVC Camcorder attached via a 37 mm filter thread to the EagleEye adapter (Figure 4b). Although these are a fairly weighty combinations, they are reasonably stable because the camera is held vertically above the trinocular port. It would not function well with an eyepiece attached to the angled viewing port.
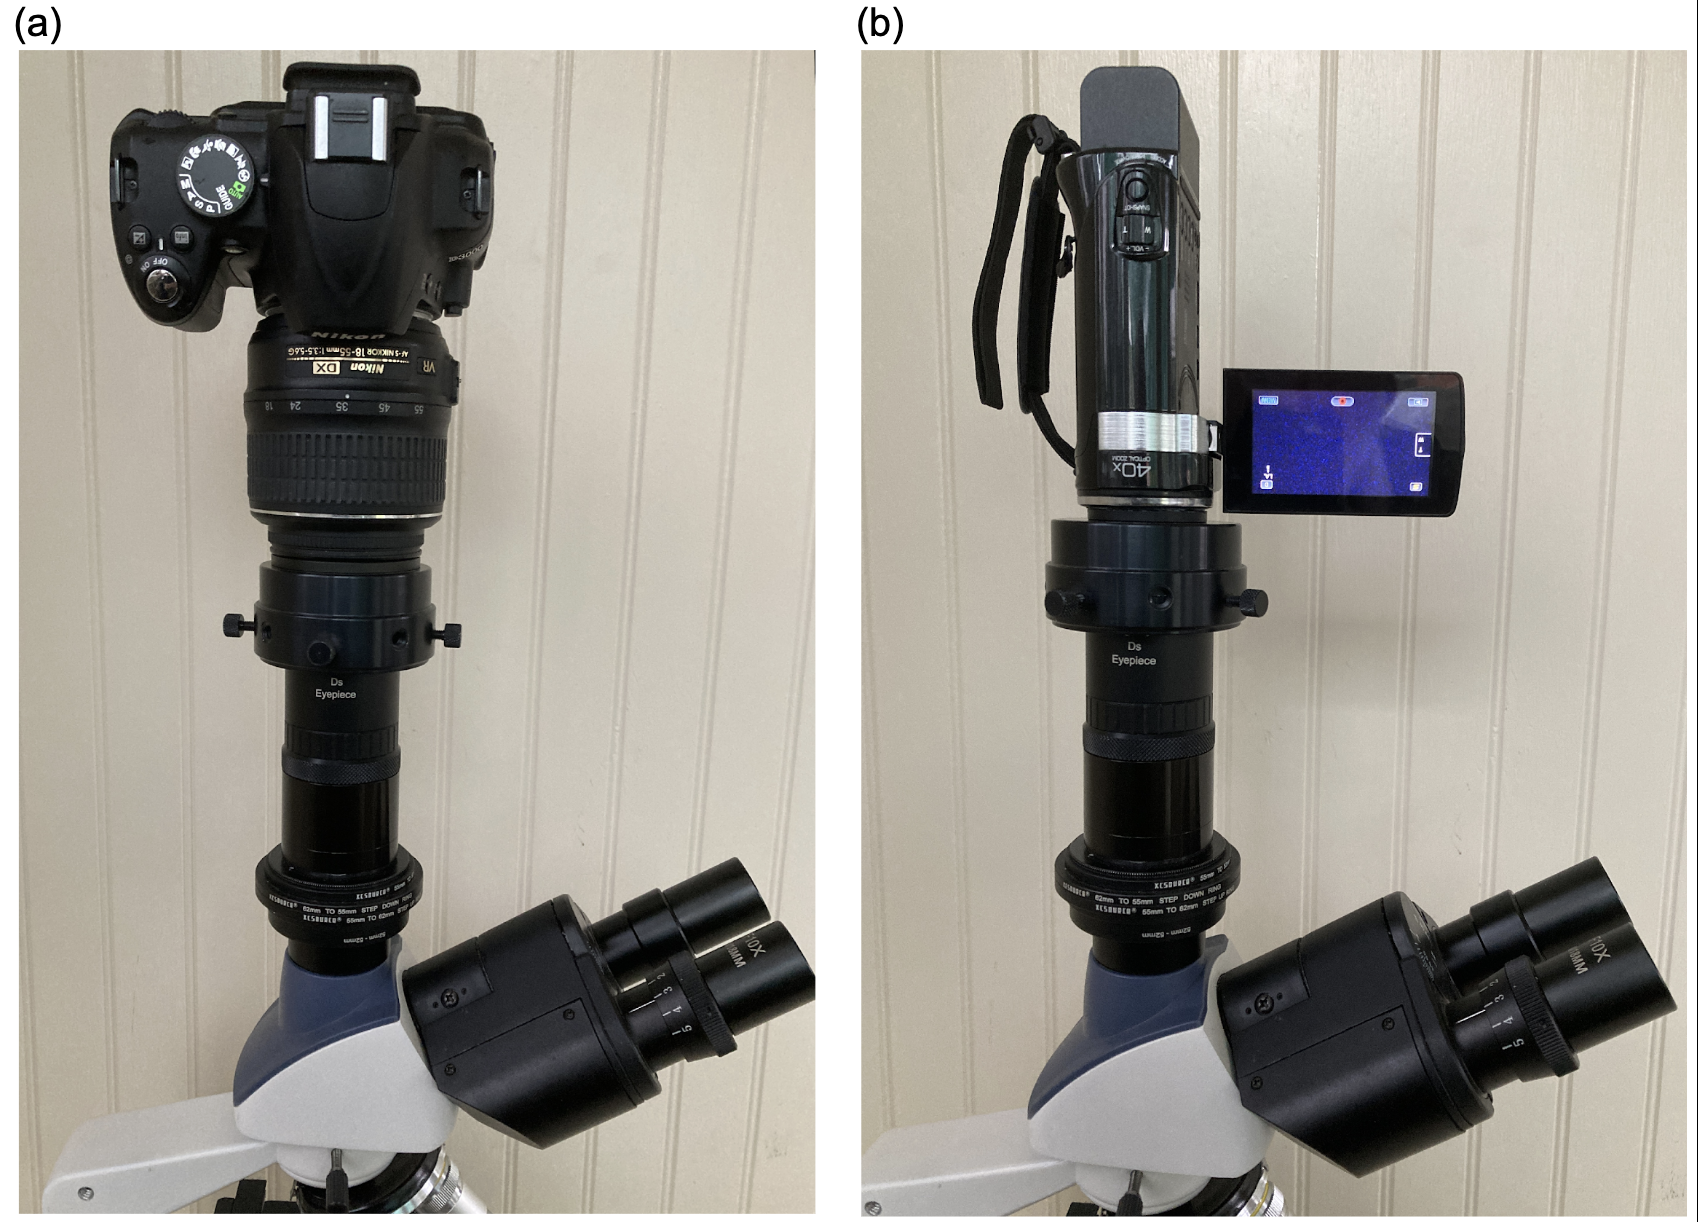
Figure 4. (a) A dSLR camera attached to the EagleEye Eyepiece. (b) A camcorder attached to the EagleEye Eyepiece.
One of the advantages of using a camera instead of a smartphone attached to an eyepiece is that the larger sensor size captures more light, and is therefore better for low light level situations, such as fluorescence microscopy. Long time exposures are also easily set up, although programs are available for smartphones for this purpose, such as the Easy Long Exposure app. In low light level situations, a 2-fold gain in signal can be obtained by bypassing the trinocular head unit and capturing the image directly using a phototube to connect the microscope body with the EagleEye piece – made from a vacuum cleaner tube as described in a previous Corner (Figure 5a).
So, how do the images compare with those obtained by capturing the primary image? Figure 5b shows the full field-of-view captured by the Nikon dSLR through the EagleEye Eyepiece and a 10x plan objective lens. This field extends beyond the 2 mm graticule slide, indicating a field number greater than 20. The image quality tapers off beyond 18 mm at the primary image plane, limited by the objective lens, but it is considerably better (Figure 5c,d) than that obtained directly at the primary image plane in the 10 to 18 mm region (Figure 5e,f). The EagleEye Eyepiece therefore does a good job in correcting the aberrations inherent in the 160 mm tube length 10x objective lens.
In conclusion, the best inexpensive option for photomicroscopy depends on the camera(s) and accessories to hand. In my case, a lensless USB eyepiece camera works well for routine plankton recording. The small field-of-view can be overcome using a lower power objective. Although this route provides less resolution, the depth-of-field is increased which helps give an overall impression of larger plankton. Alternatively, when better quality images are required, using the afocal technique with a wide diameter telescope eyepiece and dSLR or mirrorless camera is my choice, particularly under low light conditions, such a fluorescence.
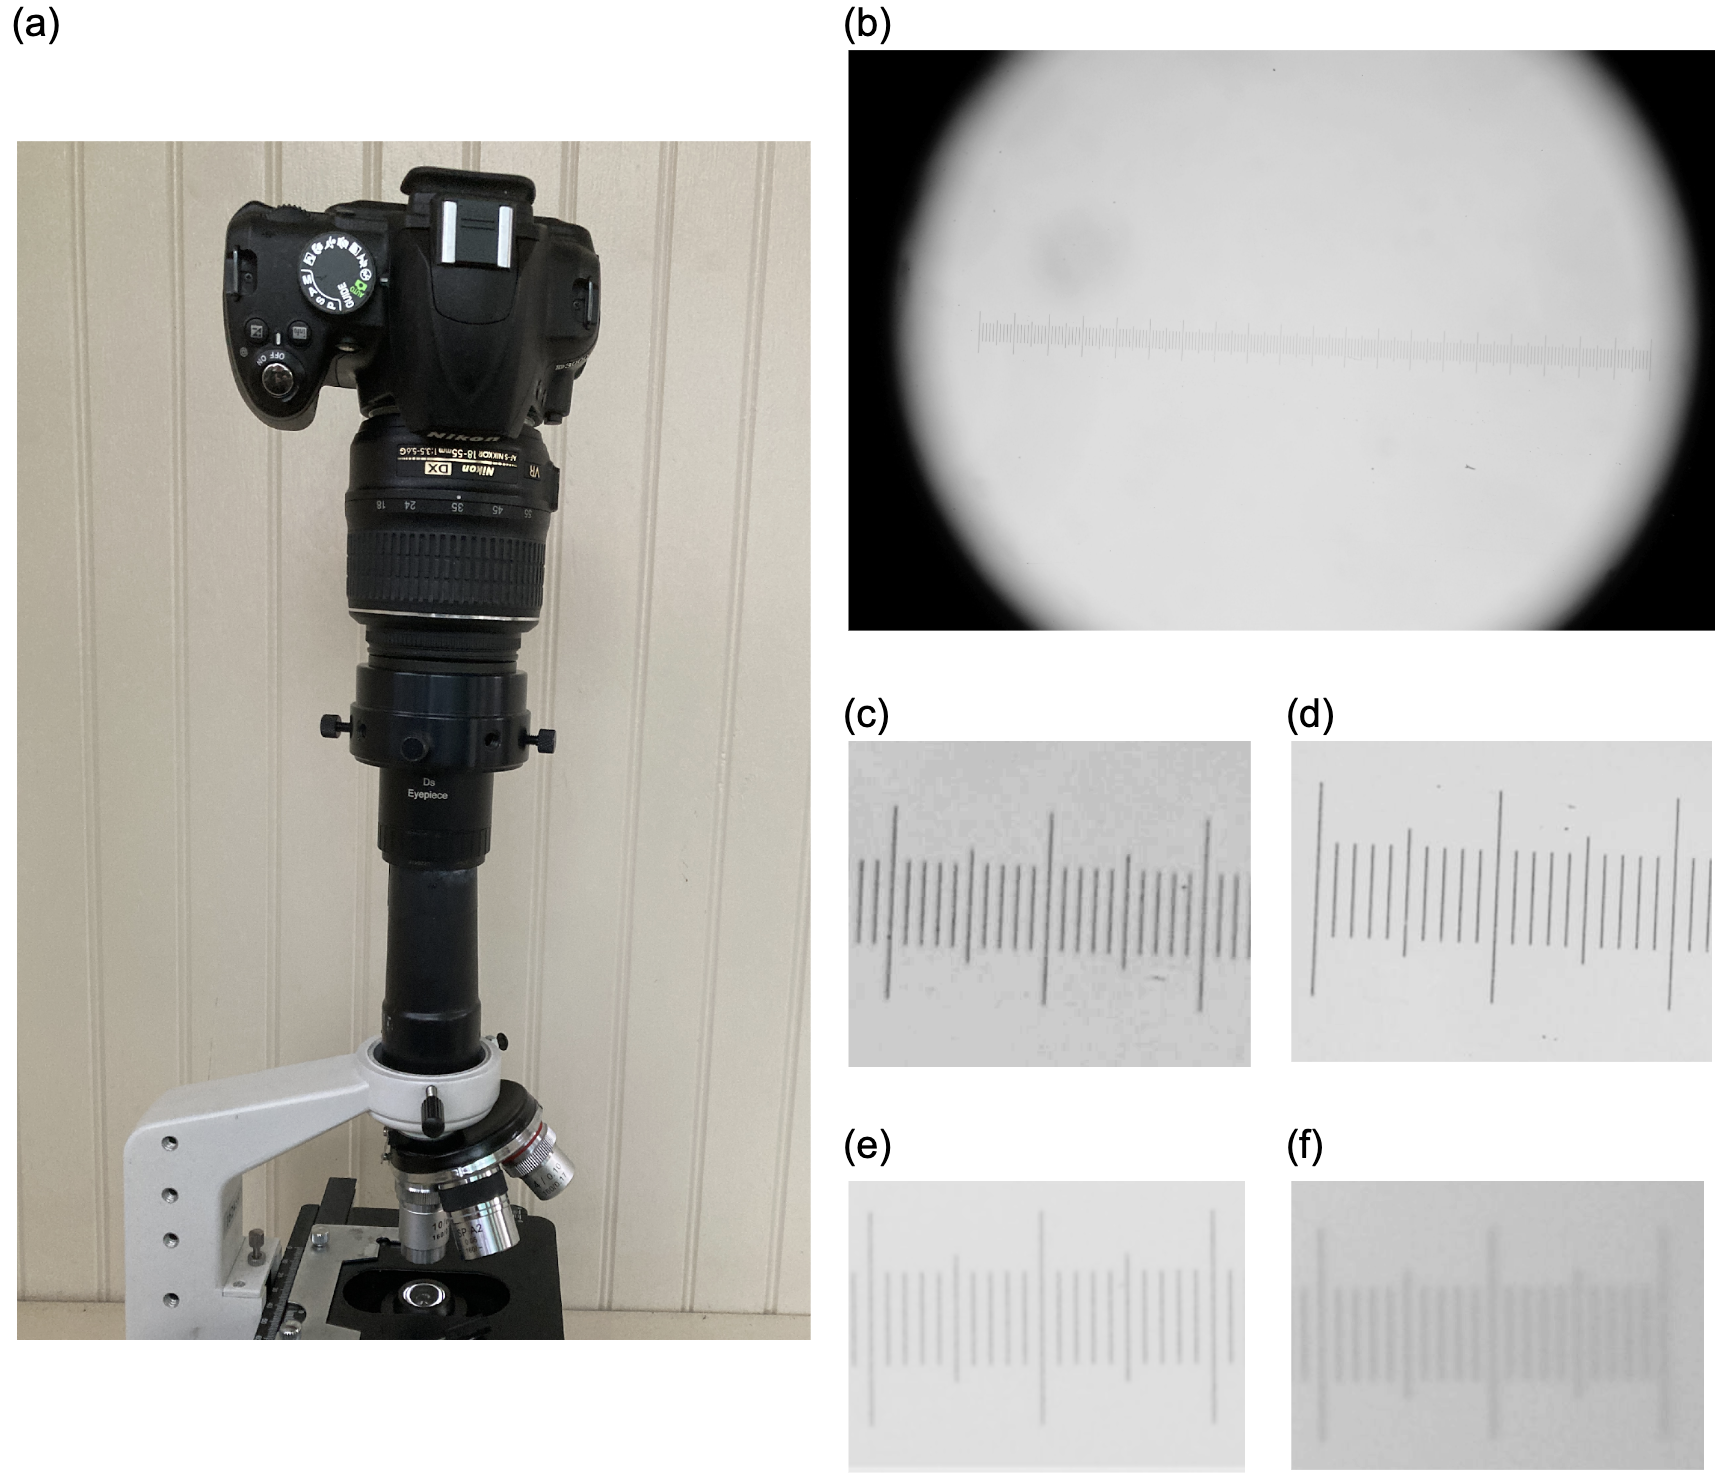
Figure 5. (a) dSLR camera attached to the EagleEye Eyepiece connected to the microscope body using a plastic vacuum cleaner tube. (b)Full field-of-view of a 2 mm graticule slide imaged through the Eagle Eyepiece with a Nikon dSLR, with the camera lens set at 35 mm focal length. (c,d) Enlarged section taken from the (c) center and (d) edge of the graticule shown in (b). (e,f) The same camera used to record the primary image, where the edge (f) is very poor, as reported previously.