Clive’s Corner #8: An exciting challenge
Clive’s Corner by Clive Bagshaw
A feature of MicroNews, Clive’s Corner is a place created for the sharing of knowledge, tricks, and tools. The Corner is where you read about clever microscopical hacks - and submit your own. Clive’s Corner is the namesake of SFMS member Clive Bagshaw, who has spent a lifetime looking into microscopes - including 50 years studying protein reactions.
This issue of the Corner deals with a rather sensitive issue: fluorescence. Fluorescence detection is widely used in biological research but rarely so by the amateur microscopist. There are a number of reasons for this: 1) fluorescence microscopes are expensive and geared towards the research community. 2) fluorescence microscopes use ultraviolet (UV) light sources and/or lasers which pose a safety risk for home use. 3) only a few samples exhibit intrinsic fluorescence. 4) to visualize non-fluorescent samples, fluorescence stains or labels are required which are difficult for the amateur to obtain. There is truth in all these statements, but there are workarounds. The widespread use of fluorescence microscopy in cell biology research relates to points 3 and 4. The fact that most chemicals are non- or weakly fluorescent means that fluorescent labels can be attached to specific chemicals or organelles of interest and interactions can be followed with high sensitivity and excellent time resolution. But what can the amateur do?
First, what exactly is fluorescence? When light is shone on a chemical of the appropriate energy ( = wavelength = color), the atoms within become excited. Within a very short time (a picosecond = 0.000,000,000,001 second) this energy is usually dissipated as heat. In some molecules only part of the energy is lost as heat, and the remainder is released in the form of light with less energy than that which was originally absorbed. This emitted light therefore is shifted to longer wavelengths (i.e., red shifted). By using the appropriate colored filters within the microscope, the exciting light can be blocked and only the emitted light is allowed to form an image. Although the emitted light is relatively weak, in ideal conditions the background is black, allowing for highly sensitive detection.
In most commercial fluorescence microscopes, the excitation light is introduced into the body of the microscope using a dichroic mirror which reflects the excitation light towards sample via the objective lens. In this case, the objective lens doubles as a condenser. The fluorescent light is emitted in all directions, some of which finds its way back through the objective lens, but as it has a longer wavelength it passes through the dichroic mirror to the eyepiece or camera (Figure 1, left panel). The dichroic mirror helps separate the excitation from the emitted light, but the discrimination is not very high and normally additional filters are required to limit the amount of excitation light which finds its way to the imaging detector. Research-grade mirrors and filters generally cost a few $100 to more than $1,000 each and add to the expense of the microscope.
Exciting the sample via the objective lens is not an ideal solution because some of the exciting light is reflected back from the slide and other surfaces and not all of this is blocked, even by the best filters money can buy. For the lowest background and best contrast image, it is better to introduce the light from the side and not enter the microscope body. While there are some tricks to achieve this with high power objectives, with low power objectives (≤ 20x), there is sufficient working distance to do this in a simple manner. Consequently, side-lighting can be applied to practically any low power microscope (Figure 1, right panel). A similar adaptation has recently been used in conjunction with a smart phone to examine fluorescent specimens.

Figure 1. On the left: Optical arrangement used in a typical fluorescence microscope (epi-fluorescence). On the right: Alternative excitation mode using side-lighting.
A suitable excitation light source for autofluorescent samples, is an ultraviolet or blue LED flashlight. It is important that the light has a single LED chip. Multi-LED flashlights may have a higher total intensity output, but they cannot be focused to such a small spot size, so their effective brightness is no higher. Many of these flashlights come with an adjustable focusing lens, but to get the brightest illumination, a lens from a second flashlight can be taped onto the existing lens. In this way, a bright image of the LED chip can be seen at about 2 cm from the flashlight. The flashlight needs to be mounted on a table-top tripod and positioned so that the LED image is just out-of-focus at the object position and the illumination is more evenly spread over the field-of-view of the objective lens (Figure 2a).
Flashlights are available in a range of colors (wavelengths), but one in the range of 395 to 450 nm is a good place to start, particularly for autofluorescent samples (e.g. plant chlorophylls). The specifications refer to the peak wavelength, but typically LEDs emit over a 20 to 40 nm band of wavelengths. Research-grade fluorescent microscopes, particularly older models, are often equipped with white light sources that cover a range of more than 400 nm and are used in conjunction with an excitation filter to select the incoming wavelength. This filter can be omitted in the case of a narrow-band LED light source. An emission filter is still required, however, to block the reflected or scattered light and allow the longer wavelength fluorescence emission to pass through the microscope to form an image. A blue excitation source requires a yellow emission filter. Suitable cheap filters are acrylic camera filters or transparent color film. A 37 mm diameter camera filter will fit beneath the ocular head of many compound microscopes (Figure 2b) or can be attached to the objective barrel of some stereo microscopes via a stepping ring (similar to attaching a polarizing filter as described in a previous article; Fig.3d). Plastic film can be cut to any size but is generally not as robust as acrylic filters. These filters may block about 99% of the excitation light (optical density = 2) which is sufficient for bright fluorophores. For better blocking of the excitation light, an orange filter or film can be used but this may also reduce the intensity of the emitted light to some degree. Research-grade filters generally block 99.99% of the excitation light (OD = 4), while for the most stringent single molecule detection, blocking to > 99.9999% (OD = 6) is required.

Figure 2a. Use of LED flashlight for fluorescence excitation.

Figure 2b. A 37 mm yellow acrylic camera filter inserted within the body of a compound microscope to act as an emission filter.
Fluorescent emission intensities are much weaker compared with bright-field illumination, so that the microscope needs to be in a dim room – or a dark room for stringent analysis. The excitation sources are bright and may need some form of shielding. With regards to safety, LEDs can dazzle but the emitted light is not coherent, as with a laser which can cause permanent eye damage. However, LED wavelengths in the ultraviolet less than 380 nm can cause irritation to the eyes and should be used in conjunction with appropriate safety glasses. It is important that an emission filter is in place before looking through the eye-pieces when ultraviolet LEDs are used. Laser slide pointers provide another source of excitation that can be used for side-lighting with higher power objections that have a shorter working distance. These can also be used safely with appropriate precautions and will be a future discussion topic.
My original incentive for developing fluorescence detection with a basic microscope was as a means of detecting microplastics in seawater samples, as part of a community science project. For this we used a Nile Red dye that sticks to plastics and emits yellow or red light, depending on the type of plastic. We adapted several kinds of stereo microscopes for this purpose, as detailed in a video and a paper. The biggest challenge was obtaining the Nile Red dye which had to be purchased through an organization. There are a few fluorescent dyes that are more readily available to individuals, such as Acridine orange which can be obtained online and used to stain cell nuclei.
In the absence of stains, the natural fluorescence (autofluorescence) of a few materials provides specimens worthy of investigation. Figure 3 shows images of the algae, Spirogyra, obtained from my garden pond and viewed with an Amscope 120 microscope with a 10x objective. Here, the cell wall is apparent in the bright- and dark-field images, but absent in the fluorescence image which only reveals the chlorophyll in the spirally-arranged chloroplasts. The camera exposure for the fluorescence image was 2,500 times longer than for the bright-field image. However, the fluorescence was sufficient to be seen by eye in a darkened room. Other sources of auto-fluorescent samples include some scorpions, fungi and some minerals. Bioluminescent organisms often fluoresce due to specific pigments. Normally, a chemical reaction provides the energy to excite the pigment, which then emits light. Often this pigment, or an associated pigment, can be excited directly with light to produce fluorescence. These samples are much more exciting than the usually advertised subject for ultraviolet flashlights – pet pee on your carpets.
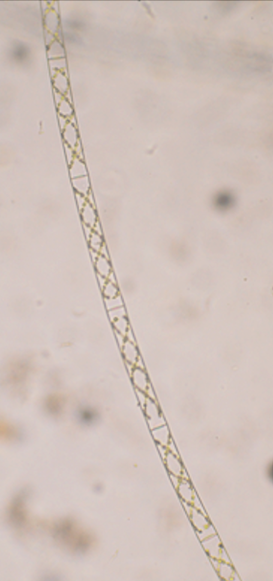
Figure 3a. Spirogyra under bright-field illumination. (Camera = Nikon 3000 dSLR with 1/500 s exposure)

Figure 3b. Same specimen under dark-field (Exposure = 1/50 s)

Figure 3c. Chloroplast fluorescence revealed using a 450 nm LED and orange emission filter (exposure = 5s)